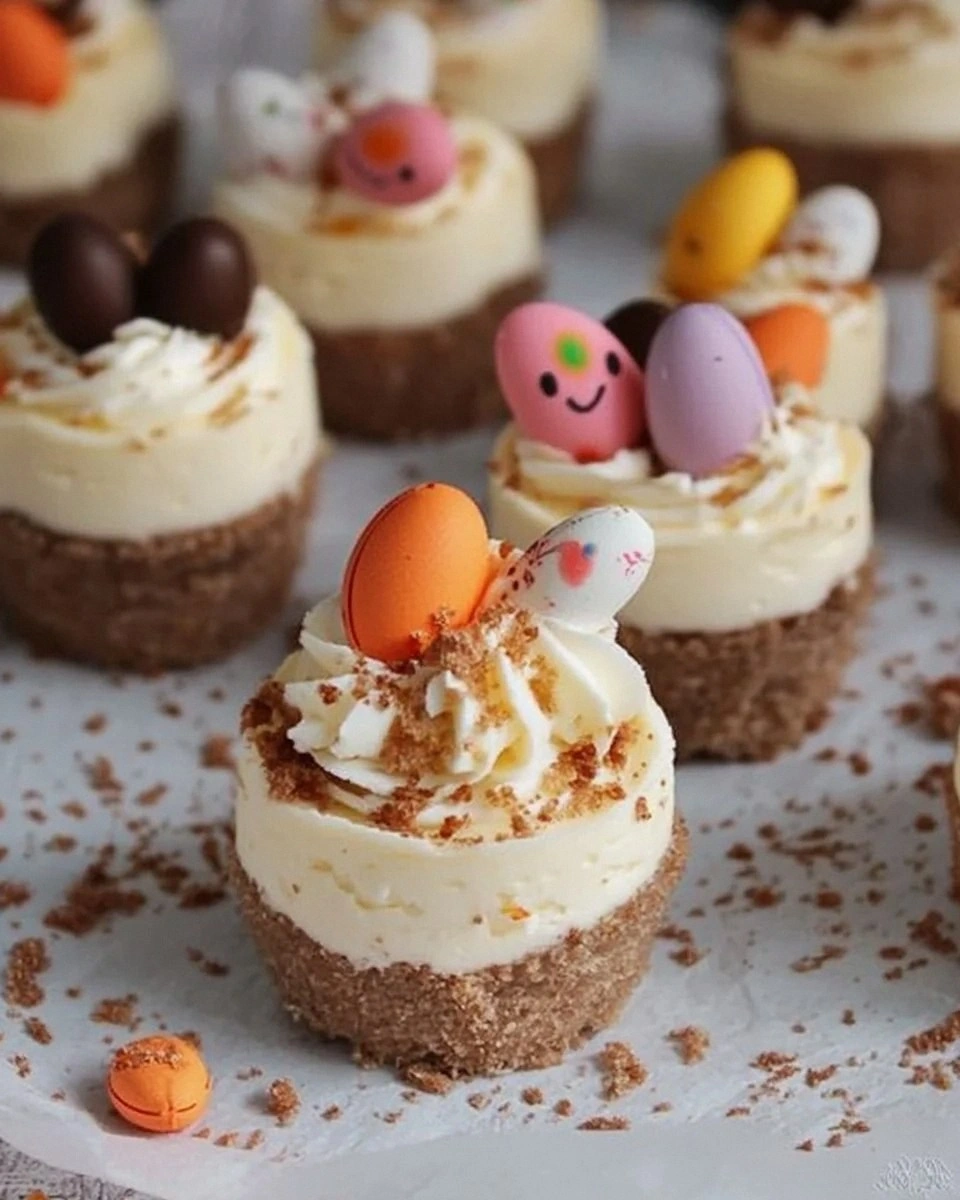
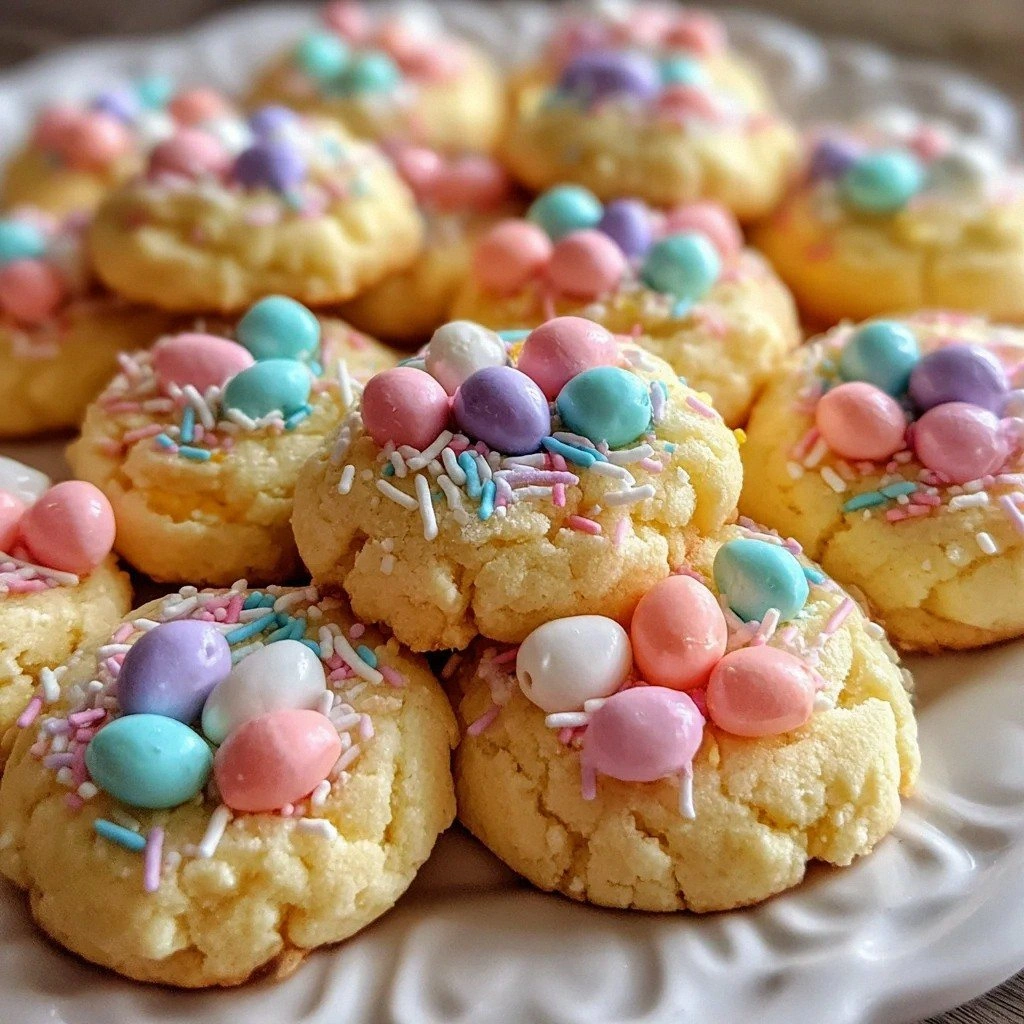
Picture this: it's 11 PM on Good Friday, my kitchen looks like a pastel crime scene, and I'm standing in my pajamas clutching a cookie sheet that smells like springtime and nostalgia. The first bite of these Easter thumbprint cookies just melted on my tongue, and I actually gasped out loud. Not a polite little "mmm," but a full-on dramatic gasp that made my cat leap off the counter. These cookies aren't just another pretty face on Pinterest — they're the culmination of three failed attempts, one minor sugar-related meltdown, and a lifetime of chasing that perfect balance between buttery tender cookie and glossy candy center.
I've been making thumbprint cookies since my grandmother taught me at age eight, but last year I decided to shake things up for Easter. Traditional jam centers felt tired, and those neon-colored store-bought cookies tasted like disappointment wrapped in food coloring. So I went rogue — swapped the jam for melted candy, added a secret ingredient that makes the cookie base taste like vanilla ice cream, and created something that had my neighbor texting me at midnight asking if I had any left. The combination of that buttery, almost shortbread-like cookie with the crisp candy shell and festive pastel sprinkles creates a texture party that makes your brain do a happy dance.
Here's the thing most recipes get wrong: they treat the cookie base as an afterthought, focusing all their attention on whatever goes in the thumbprint divot. But the cookie itself? That's where the magic lives. Too much flour and you're eating sweet cardboard. Too little and you get a greasy puddle that shatters when you try to fill it. After testing literally dozens of ratios, I landed on a formula that creates these impossibly tender edges that somehow stay crisp while the center stays soft enough to cradle that candy pool without getting soggy. It's like edible origami, and once you taste it, there's no going back to those sad, dry thumbprints from the grocery store bakery.
Let me walk you through every single step — by the end, you'll wonder how you ever made it any other way. We're talking about cookies that look like tiny Easter baskets, taste like springtime, and are so pretty you'll want to Instagram them before you eat them. But here's the real test: try to eat just one. I dare you. Last batch, I ate five before the candy centers even set. My dentist is going to love this recipe.
What Makes This Version Stand Out
Vanilla Ice Cream Flavor: The secret isn't just vanilla extract — it's the combination of browned butter cooled to exactly room temperature, plus a touch of vanilla bean paste that creates this uncanny ice cream flavor in cookie form. Your guests will taste it and immediately ask why these cookies taste like their favorite scoop shop. The browned butter adds nutty depth while the vanilla bean paste gives those gorgeous black specks that scream homemade luxury.
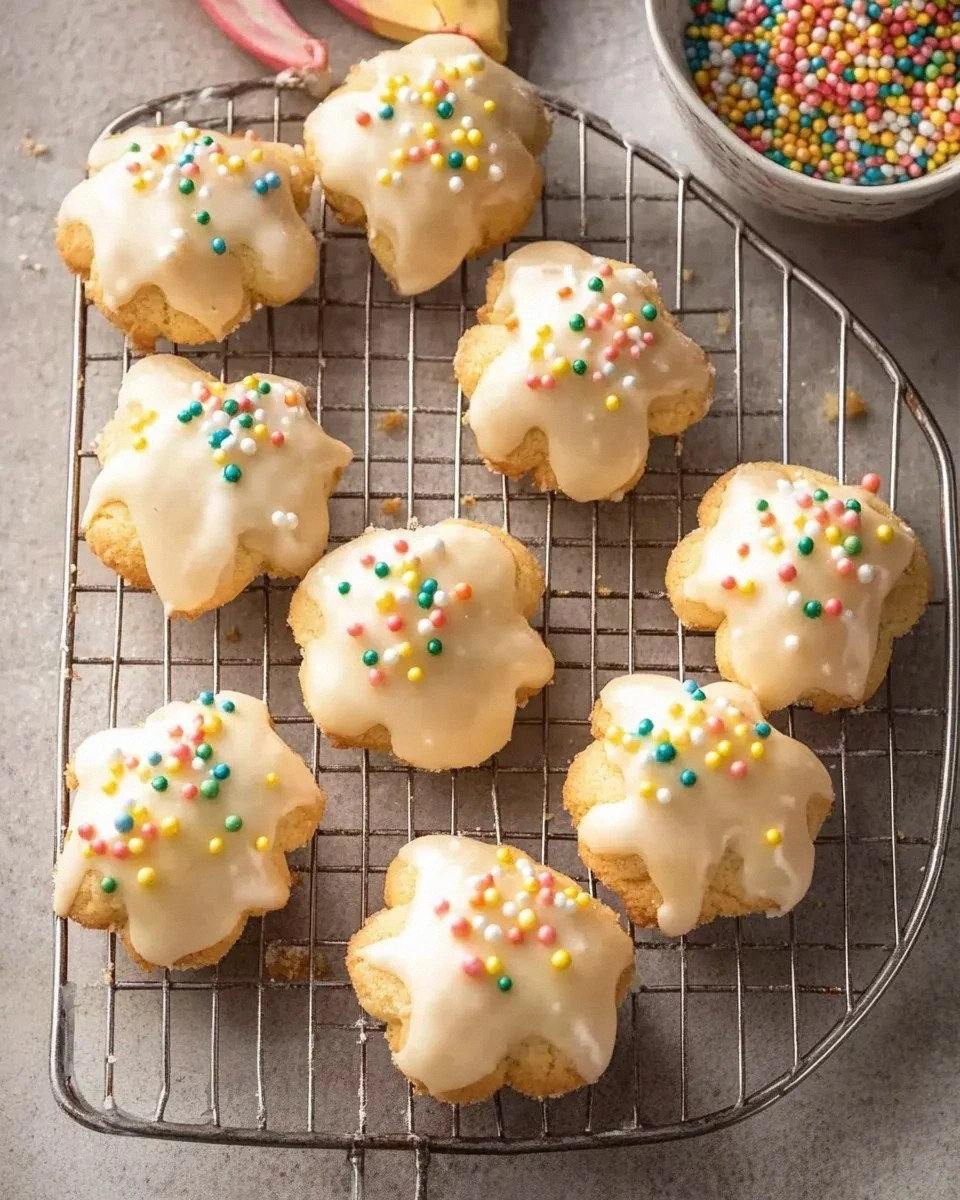
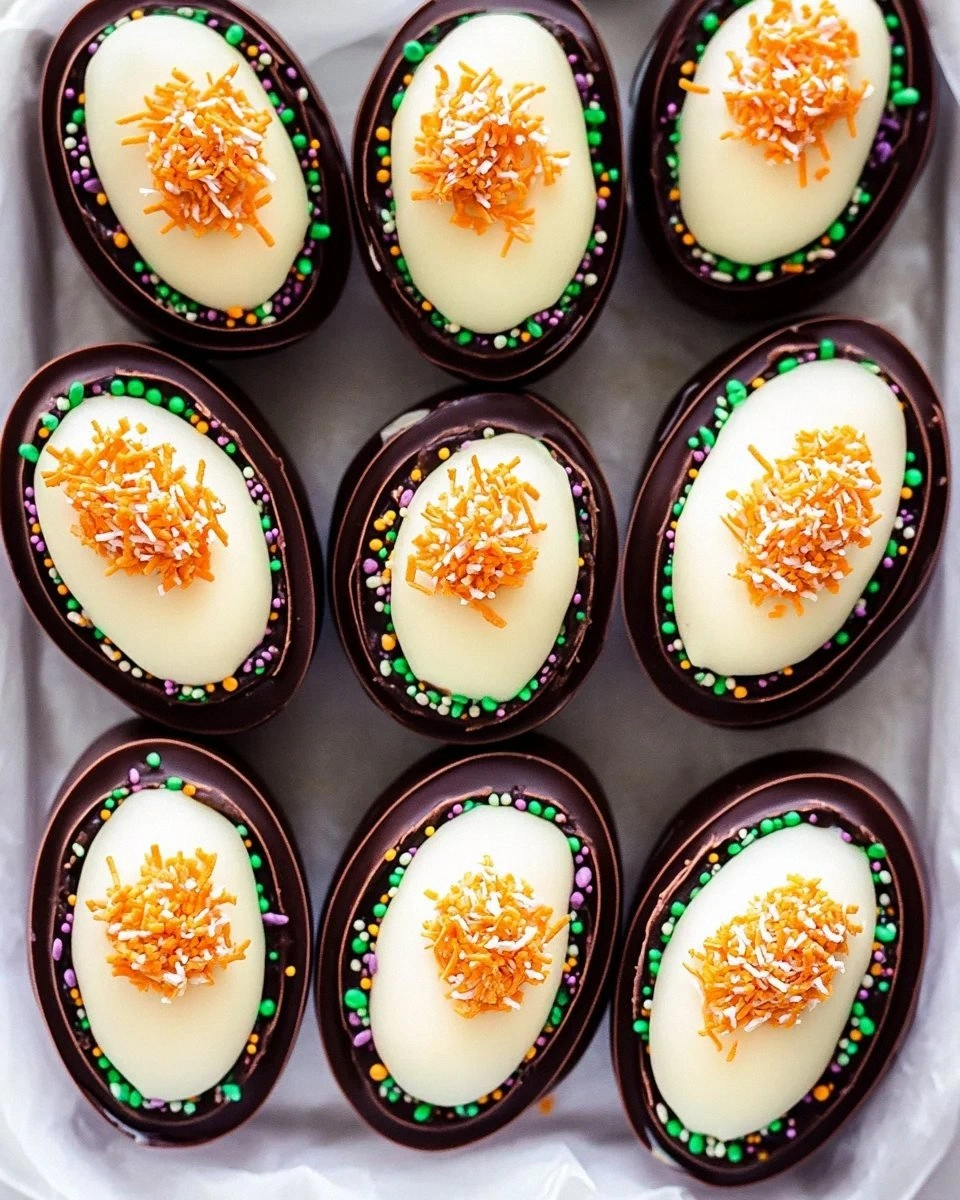
Candy Glass Centers: Forget jam that bleeds and makes everything soggy. We're creating edible stained glass using pastel candy melts that set into a crisp, shiny surface. When you bite through, there's this satisfying snap followed by the tender cookie — it's like a mini dessert turducken of textures. Plus, the candy melts come in every pastel shade imaginable, making your cookie platter look like an Easter basket exploded in the best possible way.
No-Chill Dough: Most thumbprint recipes force you to wait for hours while the dough chills, but this version uses a higher ratio of butter to flour that prevents spreading while eliminating the chill time. You can go from zero to cookies in under 45 minutes, which means spontaneous cookie cravings are totally doable. The dough handles like a dream — soft enough to roll easily but sturdy enough to hold its shape.
Fail-Proof Thumbprints: Here's the game-changer — instead of using your thumb (which always makes weird, uneven wells), grab a rounded teaspoon or the back of a small measuring spoon. The metal helps the dough release cleanly, and you'll get perfect, even wells every single time. My wells are so consistent now that they look machine-made, but in that perfectly imperfect homemade way.
Crowd-Pleasing Presentation: These cookies look like they came from a boutique bakery, but they're easier than making chocolate chip cookies from a mix. The pastel candy centers catch the light like tiny jewels, and when you add the optional sprinkles or mini eggs on top, they become instant conversation pieces. I've watched grown adults squeal with delight over these cookies — it's like Easter morning in edible form.
Make-Ahead Magic: The dough freezes beautifully for up to three months, and the baked cookies stay fresh for a week in an airtight container. But here's the real trick — you can bake the cookies and freeze them unfilled, then add the candy centers fresh whenever you need them. It's like having a secret weapon in your freezer for last-minute guests or sudden dessert emergencies.
Customizable Color Story: Whether your Easter aesthetic is soft pastels, bold brights, or sophisticated neutrals, this recipe adapts to your vision. The candy melts come in every color of the rainbow, and you can mix custom shades by combining different colors. Want lavender? Mix white and purple. Need the perfect sage green? White plus green with a touch of yellow. It's like having a Pantone deck for cookies.
Inside the Ingredient List
The Flavor Base
Unsalted butter isn't just a suggestion here — it's the foundation of everything good about these cookies. When you brown it properly, the milk solids caramelize and create this nutty, almost toffee-like flavor that makes people ask what your secret ingredient is. The key is taking it just past the point where you think it's done — those brown bits at the bottom? Liquid gold. Let it cool until it's opaque but still soft enough to cream with the sugar. If you rush this step and use hot butter, you'll scramble the egg yolk and create cookie soup.
Granulated sugar does more than sweeten — it's creating the structure that keeps these cookies tender instead of cakey. The sharp sugar crystals cut through the butter as you cream them, creating tiny air pockets that expand in the oven. This is what gives you those delicate, almost shortbread-like edges that shatter when you bite them. Don't try to reduce the sugar thinking you'll make them healthier — you'll end up with dense, sad little pucks that no amount of candy can save.
The Texture Crew
Egg yolk is your binding agent, but it's also adding richness that makes these cookies taste like they came from a French bakery. The fat in the yolk tenderizes the gluten in the flour, creating that melt-in-your-mouth sensation. Plus, it gives the cookies their gorgeous golden color. Save the white for an omelet or meringue — we only want the yolk here for maximum richness without the drying effect of the white.
All-purpose flour is the backbone, but the amount matters more than you'd think. Too much and your cookies taste like flour paste; too little and they spread into greasy puddles. I've tested this recipe with everything from cake flour to bread flour, and good old AP gives you the perfect balance of tenderness and structure. Make sure to spoon and level it — don't scoop directly from the bag or you'll pack in up to 25% more flour than intended.
The Unexpected Star
Salt is the ingredient everyone skips, but it's what makes the other flavors sing. Just a quarter teaspoon enhances the butter, balances the sweetness, and keeps the cookies from tasting flat. I use Diamond Crystal kosher salt because the larger crystals distribute more evenly, but regular table salt works too — just use slightly less since it's more compact.
Vanilla extract might seem basic, but using good quality makes a difference you can taste. Skip the imitation stuff — it tastes like chemicals and regret. Real vanilla extract has over 200 flavor compounds that create complexity. If you're feeling fancy, add a teaspoon of vanilla bean paste along with the extract for those gorgeous black specks that scream homemade luxury.
The Final Flourish
Pastel-colored candy melts or white chocolate create the signature thumbprint wells, but here's what most people don't know — you can mix custom colors by combining different candy melts. Want the perfect blush pink? Use mostly white with a few pink melts. Need lavender? White plus a touch of purple. The candy sets into a crisp, shiny surface that keeps for days without getting sticky. If you can't find pastel colors, buy white candy melts and add oil-based food coloring a drop at a time.
Mini chocolate eggs or jelly beans are your finishing touch, but timing matters. Press them into the candy center while it's still soft but not liquid — about 2-3 minutes after you fill the wells. Too soon and they sink to the bottom; too late and they won't stick. I like to mix jelly beans and chocolate eggs for variety, but pastel M&Ms or Jordan almonds work too. It's your Easter fantasy — go wild.
Everything's prepped? Good. Let's get into the real action...
The Method — Step by Step
- Start by browning your butter — place 1 cup (2 sticks) of unsalted butter in a light-colored saucepan over medium heat. Swirl occasionally as it melts, then watch closely as it foams and the milk solids turn golden brown. This takes about 5-7 minutes total. You'll know it's ready when it smells nutty and the bits at the bottom are the color of toasted hazelnuts. Pour immediately into a heatproof bowl and let cool until opaque but still soft, about 45 minutes. Don't rush this step — hot butter will melt your sugar and create greasy cookies.
- While the butter cools, line two baking sheets with parchment paper and preheat your oven to 350°F. The parchment prevents sticking and helps the bottoms stay pale and tender instead of over-browning. If you don't have parchment, lightly grease the pans but know that your cookies might spread slightly more. Position your oven rack in the center — too close to the top and the candy centers might scorch later.
- In a large bowl, cream together the cooled browned butter and 2/3 cup granulated sugar until light and fluffy. This should take 2-3 minutes with a hand mixer on medium speed. You're looking for the mixture to turn pale and increase in volume — this incorporates air that gives you tender cookies. Scrape down the bowl halfway through to ensure even mixing. The sugar should look slightly dissolved but still granular.
- Beat in 1 egg yolk and 2 teaspoons vanilla extract until fully combined. The mixture might look slightly curdled at first — that's normal. Keep mixing until it comes together into a smooth, creamy consistency. The yolk adds richness and helps bind everything together. Make sure your yolk is at room temperature or it might seize up the butter.
- In a separate bowl, whisk together 2 cups all-purpose flour and 1/4 teaspoon salt. This ensures the salt distributes evenly instead of creating salty pockets. Add the flour mixture to the butter mixture and mix on low speed just until combined. The dough will look crumbly at first but will come together when you squeeze it. Overmixing develops gluten and makes tough cookies, so stop as soon as you see no dry flour.
- Scoop tablespoon-sized portions (about 20 grams each) and roll into balls between your palms. They should be about 1 inch in diameter — any larger and they won't hold their shape well. Place them 2 inches apart on your prepared baking sheets. Work quickly so the butter doesn't warm up too much from your hands. If the dough gets sticky, pop it in the freezer for 5 minutes.
- Here's the game-changer — use the back of a rounded 1/2 teaspoon measuring spoon to create the thumbprints. Press straight down and twist slightly to release. The metal helps the dough release cleanly, and you'll get perfect, even wells every time. Don't go all the way through to the pan — you want about 3/4 depth so the candy has something to grab onto.
- Bake for 12-14 minutes, rotating the pans halfway through. The cookies are done when the edges are just starting to turn golden and the bottoms are pale. They'll still look slightly underbaked in the centers — that's perfect. They'll finish setting as they cool. If you overbake them, they'll be dry and crumbly instead of tender.
- While the cookies cool, melt your candy melts according to package directions. I like to use a small microwave-safe bowl, heating in 30-second bursts and stirring between each. You want it smooth and pourable but not too hot. If it's steaming, let it cool slightly or it will soak into the cookie and make it soggy.
- Fill each thumbprint with about 1 teaspoon of melted candy, just until it reaches the top of the well. Work quickly — the candy starts setting within 5 minutes. While it's still soft, add your sprinkles or mini eggs. Let set completely, about 15 minutes, before storing. The candy will harden into a shiny, crisp surface that keeps for days.
That's it — you did it. But hold on, I've got a few more tricks that'll take this to another level...
Insider Tricks for Flawless Results
The Temperature Rule Nobody Follows
Here's the thing that separates good bakers from great ones: temperature awareness. Your butter should be cool room temperature — soft enough to leave an indent when pressed but not greasy or melted. Eggs should be room temp too, or they'll shock the butter and cause separation. But here's the real secret: after you make the thumbprints, pop the whole tray in the freezer for 5 minutes before baking. This firms up the butter so the cookies hold their shape and the wells stay perfectly round. I learned this after one too many batches where my beautiful thumbprints turned into sad, shallow dents.
Why Your Nose Knows Best
Don't rely on a timer alone — your nose is the best kitchen tool you have. When these cookies are perfectly baked, your kitchen will smell like buttery vanilla heaven with caramel undertones from the browned butter. If you start to smell something nutty and toasty, check them immediately — that's the signal they're done or maybe 30 seconds past. Overbaked cookies lose that tender, almost shortbread-like texture that makes these special. Trust your senses, not just the clock.
The 5-Minute Rest That Changes Everything
After you fill the candy centers, walk away for exactly 5 minutes. Don't hover, don't poke, don't even look at them. This is when the magic happens — the candy starts setting from the outside in, creating that perfect glossy surface. If you add decorations too early, they'll sink and create craters. Too late, and they won't stick. Set a timer and resist the urge to fuss with them. I use this time to wash the dishes and clear my counter for the next batch.
The Secret to Even Wells
Beyond using the measuring spoon trick, here's how to get bakery-perfect wells every time: dip your spoon in flour before making each impression. The flour prevents sticking and helps the dough release cleanly. After every few cookies, wipe off any dough that accumulates on the spoon and re-flour. This keeps your wells consistent and prevents the dough from tearing. It's a small step that makes a huge difference in the final appearance.
Storage Game-Changer
Here's what nobody tells you: store these cookies in a single layer, not stacked. The candy centers can stick to each other and create a colorful mess. If you must stack them, place a piece of parchment between layers. And here's the real pro tip — add a small piece of bread to the container. It keeps the cookies tender by adding just enough moisture to prevent them from drying out, but not enough to make them soggy. Replace the bread every day or two.
Creative Twists and Variations
This recipe is a playground. Here are some of my favorite ways to switch things up:
Lemon Burst Easter Cookies
Add 1 tablespoon of lemon zest to the dough along with the vanilla for bright, springy cookies that taste like sunshine. Fill with yellow candy melts and top with white chocolate shavings. The citrus cuts through the richness and makes these taste like lemon shortbread. Perfect for people who find traditional thumbprints too sweet.
Salted Caramel Dream
Replace the vanilla with 1 teaspoon of caramel extract and add a pinch of flaky sea salt to the tops of the candy centers while they're still soft. The salty-sweet combination is addictive, and the caramel flavor pairs beautifully with the browned butter in the dough. These disappear faster than anything else at potlucks.
Chocolate Lover's Paradise
Add 2 tablespoons of cocoa powder to the flour and fill with white candy melts for a stunning contrast. Top with chocolate shavings or mini chocolate eggs. The chocolate cookie base is rich and fudgy, while the white centers keep things visually striking. Kids go crazy for these because they look like tiny fried eggs.
Bunny Trail Mix Cookies
Mix 1/2 cup of finely chopped mixed nuts into the dough for texture and protein. Fill with white candy melts and top with a mix of chopped nuts, dried cranberries, and mini marshmallows. These taste like the best parts of trail mix in cookie form, and the nuts keep them from being too sweet.
Spring Garden Party
Tint white candy melts with a tiny bit of green food coloring for mint-green centers. Top with edible flowers or crystallized violets for cookies that look like they came from a fancy garden party. These are stunning for bridal showers or spring brunches. The floral notes complement the vanilla beautifully.
Peanut Butter Surprise
Replace 1/4 cup of the butter with creamy peanut butter and fill with chocolate candy melts. The peanut butter flavor is subtle but adds depth, and the chocolate centers make these taste like peanut butter cups in cookie form. My colleagues request these for every office party.
Storing and Bringing It Back to Life
Fridge Storage
These cookies keep beautifully in an airtight container at room temperature for up to 5 days. Don't refrigerate them — the candy centers can develop condensation and get sticky. Store in a cool, dry place away from direct sunlight. If your kitchen is particularly warm, the candy might soften slightly, but it'll firm back up as it cools. For best results, eat within 3 days when the candy centers are at their crispiest.
Freezer Friendly
The dough freezes like a dream for up to 3 months. Roll into balls, create the thumbprints, then freeze on a tray before transferring to a freezer bag. Bake from frozen, adding 2-3 minutes to the baking time. You can also freeze the baked, unfilled cookies for up to 2 months. Just thaw and fill with fresh candy melts when you're ready to serve. This makes last-minute entertaining totally stress-free.
Best Reheating Method
If your cookies have gone a bit soft (especially in humid weather), here's how to revive them: place them on a baking sheet in a 300°F oven for 3-4 minutes. This refreshes the cookie base without melting the candy centers. Let cool completely before serving. They'll taste almost as good as fresh-baked. Don't microwave them — the candy will melt and make a mess.