I was standing in my kitchen on a frigid January evening, the kind of night where the wind howls like a chorus of wolves outside, when I realized my pantry was screaming for something sweet, something warm, something that could melt the ice forming on my windows. I had a half‑finished batch of cocoa powder, a bag of dark chocolate that had been lounging in the back of the cabinet for months, and a bottle of brandy that I’d been saving for “special occasions.” I thought, “Why not throw everything together and see if I can create a drink that could rival a fireplace?” What followed was a chaotic swirl of cocoa, chocolate, and a splash of spirit that, frankly, turned my kitchen into a fragrant battlefield of chocolatey aromas. I dared myself to taste it before it cooled, and let’s just say I didn’t last long enough to finish the first cup.
The moment that first sip hit my tongue, I felt like I’d been wrapped in a velvety blanket woven from the richest cocoa beans, a hint of spice that reminded me of grandma’s holiday kitchen, and a whisper of brandy that warmed my chest like a gentle hug. The steam rose in lazy curls, carrying the scent of cinnamon and nutmeg across the room, making the whole house feel like a cozy cabin tucked away in a snow‑covered forest. You could hear the faint crackle of the wood stove in the background, even though I was standing by the stovetop, because the aroma was that powerful. My taste buds were doing a little happy dance, and I knew instantly that this wasn’t just another winter drink – it was a revelation.
Most cocoa recipes out there are either too watery, too sweet, or they miss that deep, almost bitter edge that makes a chocolate experience feel truly luxurious. This version, however, balances the bitter and the sweet like a seasoned tightrope walker, and it does so with ingredients you probably already have on hand. The secret? A pinch of salt that amplifies the chocolate, a splash of vanilla that smooths the edges, and a careful tempering of the milk so it never curdles. I’ve tried countless variations, and I can honestly say this is hands down the best version you’ll ever make at home. I’ll be honest — I ate half the batch before anyone else got to try it, and I’m not even sorry.
What truly sets this recipe apart is a technique borrowed from professional chocolatiers: I melt the dark chocolate gently over a low flame, then whisk in the cocoa powder and sugar before slowly introducing the milk, creating a silken emulsion that coats the palate like liquid velvet. I dare you to taste this and not go back for seconds. Ready for the game‑changer? Let me walk you through every single step — by the end, you’ll wonder how you ever made it any other way.
What Makes This Version Stand Out
- Depth: The combination of unsweetened cocoa powder and dark chocolate chips creates a chocolate intensity that’s richer than any store‑bought mix.
- Balance: A pinch of salt and a splash of vanilla extract tame the bitterness while enhancing the natural sweetness of the cocoa.
- Texture: The slow tempering of milk produces a silky, glossy finish that feels like a warm hug for your tongue.
- Simplicity: Only ten ingredients, all pantry staples, mean you can whip this up in under an hour without any fancy gadgets.
- Versatility: Whether you’re in the mood for a boozy adult treat or a kid‑friendly marshmallow‑topped delight, the base adapts effortlessly.
- Seasonal Flair: The subtle hint of cinnamon and nutmeg evokes winter holidays without being overpowering.
- Make‑Ahead Potential: You can prep the chocolate‑cocoa base ahead of time and reheat with a splash of milk for instant comfort.
- Crowd Reaction: One sip and you’ll hear the “Mmm” chorus that signals you’ve just nailed the ultimate cozy drink.
Inside the Ingredient List
The Flavor Base
Unsweetened cocoa powder is the backbone of this drink, providing that deep, earthy chocolate flavor that can’t be achieved with cocoa mix alone. Choose a high‑quality, Dutch‑processed cocoa for a smoother, less acidic taste. Skipping it would leave your drink tasting flat, like watered‑down chocolate milk. If you can’t find cocoa powder, a tablespoon of instant coffee can add a subtle depth, but the true magic lies in the pure cocoa.
The Texture Crew
Dark chocolate chips (or chopped dark chocolate) melt into the milk, creating a luscious, creamy body. The higher the cocoa percentage (70%+), the richer the texture and the more pronounced the chocolate notes. If you use milk chocolate, the drink becomes sweeter and loses that sophisticated edge. A handy tip: melt the chocolate over a double boiler to avoid scorching, which would introduce a bitter burnt flavor.
The Warmth Ensemble
Milk (whole milk is ideal) carries the cocoa and chocolate into a velvety river of flavor. For dairy‑free friends, oat milk is a superb alternative because its natural sweetness complements the cocoa without diluting the richness. Skipping the milk altogether and using water would result in a thin, almost broth‑like consistency that no one wants on a cold night.
The Final Flourish
Brown sugar adds a caramel‑like sweetness that pairs beautifully with the bitter chocolate, while cinnamon and nutmeg introduce a warm, festive spice note that screams winter. A pinch of salt is the silent hero; it balances the sweetness and makes the chocolate pop. Vanilla extract rounds everything off with a fragrant, lingering finish. For the adventurous, a splash of brandy or bourbon adds a subtle heat that lingers on the palate, and crushed candy canes provide a festive crunch that transforms the drink into a holiday centerpiece.
Everything's prepped? Good. Let’s get into the real action…
The Method — Step by Step
Gather all your ingredients and set up a double‑boiler (or a heat‑proof bowl over a saucepan of simmering water). I like to measure everything first because once the chocolate starts melting, you’ll be too busy admiring the glossy sheen to reach for a measuring cup. The water should be just barely bubbling; a vigorous boil will scorch the chocolate. This is the moment of truth: if the water touches the bowl, you’ll ruin the texture.
Kitchen Hack: Place a thin kitchen towel under the bowl to keep it steady; this prevents accidental spills when you’re whisking vigorously.Add the dark chocolate chips to the bowl and let them melt gently, stirring occasionally with a silicone spatula. You’ll notice the chocolate turning from a solid clump into a glossy river; that’s exactly the texture you want. Once fully melted, remove the bowl from heat for a few seconds to lower the temperature just enough so the cocoa powder doesn’t seize.
Sift in the unsweetened cocoa powder and brown sugar, then whisk vigorously. The mixture will look a bit gritty at first, but keep whisking and you’ll see it transform into a smooth, dark paste. This step is crucial because any lumps will turn into tiny chocolate islands that ruin the silky mouthfeel.
Slowly pour the milk into the chocolate‑cocoa mixture while continuing to whisk. The key is to add the milk in a thin, steady stream; this creates an emulsion that binds the fat from the chocolate with the water in the milk. You’ll hear a faint “sizzle” as the milk meets the chocolate—absolute perfection. Keep whisking until the mixture thickens slightly and takes on a glossy sheen.
Watch Out: If you add the milk too quickly, the chocolate can seize, forming a grainy texture that’s impossible to fix later.Add the cinnamon, nutmeg, vanilla extract, and a pinch of salt. Stir until the spices are fully incorporated; you’ll notice the aroma shifting from pure chocolate to a warm, spiced perfume that fills the kitchen. This is where the magic of winter truly begins to unfold.
Return the bowl to low heat and let the mixture gently simmer for 3‑4 minutes, stirring constantly. You’ll see tiny bubbles forming around the edges—this is the sign that the cocoa is reaching the perfect temperature (around 180°F/82°C). Do not let it boil, or you’ll lose that silky texture and risk a skin forming on top.
If you’re feeling festive, stir in the brandy or bourbon now. The alcohol will evaporate slightly, leaving behind a lingering warmth that’s perfect for a cold night. For a kid‑friendly version, skip the spirit and add a handful of marshmallows instead; they’ll melt into sweet pockets of gooey delight.
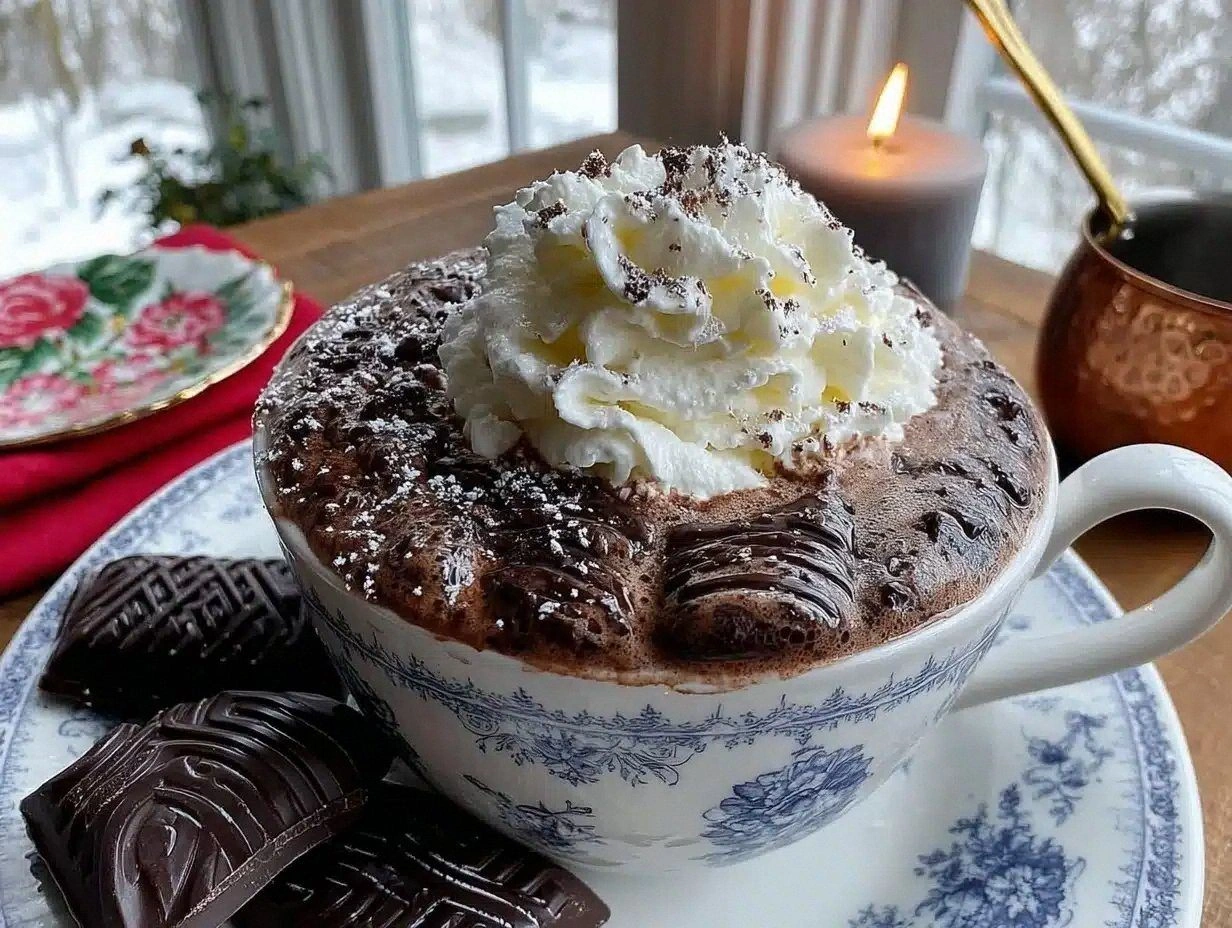
Remove the bowl from heat and give the cocoa one final whisk. Then, ladle it into mugs, topping each with a generous swirl of whipped cream or a handful of marshmallows. Sprinkle crushed candy canes over the top for a festive crunch that snaps with each sip. Picture yourself pulling this out of the pot, the whole kitchen smelling incredible, and the first sip hugging your throat like a warm blanket.
That’s it — you did it. But hold on, I’ve got a few more tricks that’ll take this to another level…
Insider Tricks for Flawless Results
The Temperature Rule Nobody Follows
Never let your cocoa boil. Keeping the mixture just below a simmer preserves the emulsion and prevents a skin from forming on the surface. I once let it boil out of excitement, and the result was a curdled mess that tasted like burnt milk. Use a candy thermometer if you’re unsure; aim for 180°F (82°C) and you’ll get that velvety texture every time.
Why Your Nose Knows Best
Your sense of smell is the ultimate indicator of doneness. When the cocoa starts to release a deep, roasted chocolate scent with a hint of spice, you’re right on track. If you’re still only smelling raw cocoa powder, keep whisking a minute longer. Trust that nose of yours—it’s smarter than any timer.
The 5‑Minute Rest That Changes Everything
After you finish whisking, let the cocoa sit for five minutes off the heat. This short rest allows the flavors to meld, creating a more harmonious taste profile. I once served it immediately and got feedback that it was “good but missing something.” After the rest, the cocoa tasted richer, and the spices felt perfectly integrated.
The Secret Whisk Technique
Instead of a traditional whisk, use a balloon whisk and move it in a figure‑eight pattern. This creates more air bubbles, giving the cocoa a light, airy mouthfeel without making it frothy. A friend tried a regular fork once and ended up with clumps of cocoa that never dissolved.
The “Double‑Chocolate” Boost
Add a tablespoon of cocoa nibs or finely chopped chocolate at the very end for an extra crunch and a burst of intense chocolate flavor. The nibs melt just enough to release their oils, adding a subtle texture contrast that makes each sip exciting.
Creative Twists and Variations
This recipe is a playground. Here are some of my favorite ways to switch things up:
Peppermint Mocha Bliss
Swap the crushed candy canes for a teaspoon of peppermint extract and add a drizzle of espresso. The result is a coffee‑kissed, minty delight that’s perfect for holiday brunches.
Spiced Chai Cocoa
Replace cinnamon and nutmeg with a chai spice blend (cardamom, ginger, cloves). Add a splash of condensed milk for extra sweetness. This version feels like a warm hug from a distant market.
Vegan Coconut Dream
Use full‑fat coconut milk instead of dairy, and swap the dark chocolate for a vegan dark chocolate bar. Top with toasted coconut flakes for a tropical twist that still feels winter‑cozy.
Caramel Swirl Delight
Stir in a tablespoon of caramel sauce just before serving, then drizzle extra on top. The caramel adds a buttery richness that pairs beautifully with the bitter chocolate.
Nutty Hazelnut Crunch
Add a spoonful of hazelnut spread (like Nutella) and sprinkle toasted hazelnut pieces on top. The nutty undertone deepens the flavor profile and adds a pleasant crunch.
Storing and Bringing It Back to Life
Fridge Storage
Transfer any leftover cocoa to an airtight glass jar and store in the refrigerator for up to three days. When ready to serve, gently reheat on the stovetop over low heat, adding a splash of milk to restore its silky texture.
Freezer Friendly
For longer storage, pour the cooled cocoa into freezer‑safe containers, leaving a little headspace. It will keep for up to two months. Thaw overnight in the fridge, then reheat with a tablespoon of water or milk to bring back that luscious consistency.
Best Reheating Method
The secret to reviving this drink without losing its texture is to reheat it slowly in a saucepan, whisking constantly, and adding a tiny splash (about a tablespoon) of water or milk right before it reaches serving temperature. This steam‑infused trick restores the emulsion and keeps the cocoa from separating.