I still remember the exact moment my kitchen turned into a tropical storm of coconut, butter, and sheer panic. I had promised my sister a “fancy dessert” for her birthday, but the only thing I could find in the pantry was a half‑empty can of coconut milk and a bag of shredded coconut that had been hiding behind the cereal boxes for months. The first attempt? A soggy, flavorless crust that fell apart the second I tried to lift it—like a sandcastle in a hurricane. I dared myself to keep trying, because I knew the world deserved a coconut cream pie that didn’t taste like a cheap supermarket mystery. After a sleepless night, three failed batches, and a whole lot of tasting (yes, I ate half the batter before anyone else could), I finally cracked the code.
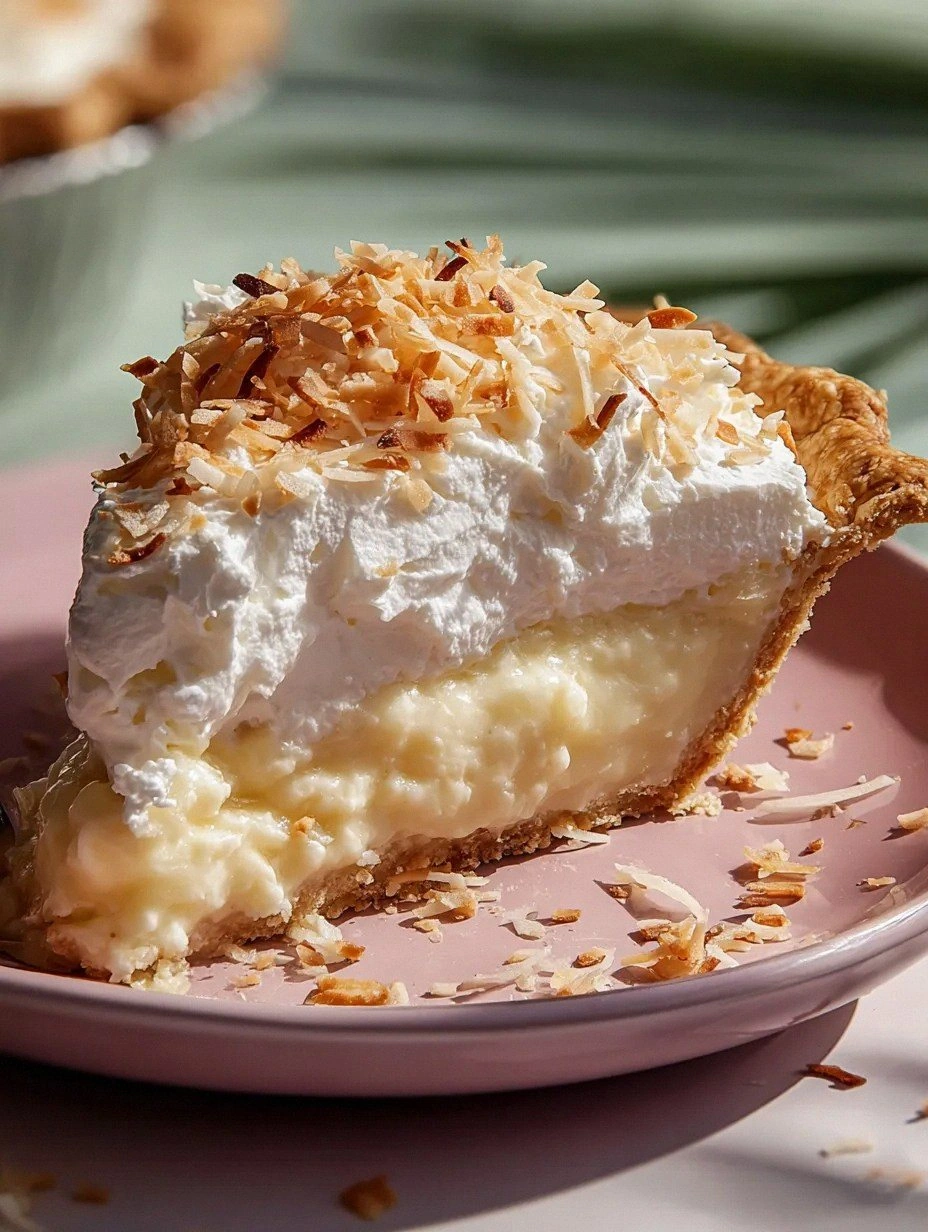
Picture yourself pulling this pie out of the oven, the whole kitchen smelling like a beachside café at sunset, the golden crust gleaming under the kitchen lights, and that silky coconut filling shimmering like a tropical lagoon. The moment the whipped cream crown hits the surface, you’ll hear that soft “plop” that tells you you’ve just created something truly unforgettable. The secret? A dash of toasted coconut that adds a crunch so satisfying it practically sings, and a coconut‑cream‑to‑milk ratio that makes the filling luxuriously thick without ever turning rubbery. Most recipes get this completely wrong—either they drown the pie in watery coconut milk or they skip the butter in the crust, resulting in a soggy disaster. Not this one.
I’m about to hand you the exact, battle‑tested method that turned my kitchen fiasco into a crowd‑pleasing masterpiece. This version is hands down the best coconut cream pie you’ll ever make at home, and I dare you to taste it and not go back for seconds. If you’ve ever struggled with a crust that collapses or a filling that cracks, you’re not alone — and I’ve got the fix. I’ll be honest — I ate half the batch before anyone else got to try it, but the leftovers were still so good that I had to make a second pie the very next day.
Okay, ready for the game‑changer? The technique that separates the “good” from the “legendary” is a simple double‑bake method for the crust and a tempering trick for the egg yolks that prevents curdling while giving the filling a silk‑smooth finish. And there’s a surprise ingredient that you won’t expect— a pinch of cream of tartar that stabilizes the whipped topping, keeping it fluffy for hours. Let me walk you through every single step — by the end, you’ll wonder how you ever made it any other way.
What Makes This Version Stand Out
- Flavor Explosion: The combination of full‑fat coconut milk and coconut cream creates a rich, buttery taste that’s deeper than any canned version you’ve tried.
- Texture Harmony: A crisp, buttery crust meets a velvety, custard‑like filling and a light, airy whipped‑cream topping for a perfect bite every time.
- Simplicity Meets Sophistication: Only nine ingredients, but each one is used at its peak, meaning you don’t need a pantry full of exotic spices.
- Unique Crunch: Toasted coconut flakes add a toasty crunch that contrasts beautifully with the smooth filling—think beach‑side bonfire in your mouth.
- Crowd Reaction: This pie has a proven track record of emptying plates within minutes; guests will be begging for the recipe.
- Ingredient Quality: Using a high‑quality, full‑fat coconut milk (not the “lite” version) makes all the difference in flavor and mouthfeel.
- Cooking Method: The double‑bake crust prevents sogginess, while the gentle tempering of egg yolks guarantees a flawless custard.
- Make‑Ahead Potential: Once assembled, the pie can sit in the fridge for up to two days without losing its texture, perfect for party prep.
Inside the Ingredient List
The Flavor Base
All‑purpose flour forms the skeleton of the crust, providing structure while staying neutral enough to let coconut shine. If you swap it for whole‑wheat flour, you’ll get a nuttier flavor but risk a denser crust that may not hold the filling as well. The sugar in the crust isn’t just for sweetness; it caramelizes slightly during blind‑baking, giving the edges a golden hue that’s both visual and aromatic. I always recommend a fine granulated sugar for even distribution, and if you want a deeper flavor, a tablespoon of brown sugar adds a subtle molasses note without overpowering the coconut.
The Texture Crew
Unsalted butter is the hero here—its water content creates steam, which lifts the crust, while the fat adds that melt‑in‑your‑mouth richness. For the best results, cut the butter into ¼‑inch cubes and keep it in the freezer until you’re ready to blend; this prevents the butter from turning into a paste before it hits the oven. The ice water is the secret handshake that brings the dough together without over‑working it; just enough to make the dough cohesive, but not so much that it becomes sticky. If you’re short on ice water, a splash of chilled coconut milk can add a hint of coconut flavor to the crust without compromising texture.
The Unexpected Star
Coconut cream is the unsung champion of this pie—it’s the thick, rich layer that sits atop the coconut milk, delivering that luxurious mouthfeel you crave. If you accidentally use only coconut milk, the filling will be too runny; the cream’s higher fat content is what thickens the custard without relying on excessive starch. A pinch of cream of tartar in the whipped topping stabilizes the peaks, ensuring that the clouds of cream stay fluffy for hours, even in a warm kitchen. And don’t underestimate the power of a splash of vanilla extract; it lifts the entire flavor profile, making the coconut taste even more aromatic.
The Final Flourish
Toasted coconut flakes are the final garnish that turns a good pie into a show‑stopper. Toast them lightly in a dry skillet until they turn a golden amber—watch closely, because they go from perfect to burnt in seconds. This step adds a crunchy contrast that prevents the pie from feeling one‑note, and the nutty aroma is instantly recognizable. If you’re feeling adventurous, a drizzle of dark rum over the toasted flakes adds a subtle boozy kick that pairs beautifully with the coconut’s sweetness.
Everything's prepped? Good. Let's get into the real action...
The Method — Step by Step
Start by whisking together 1 ½ cups flour, ½ cup granulated sugar, and ¼ tsp salt in a large bowl. Add the cubed, ice‑cold butter and, using a pastry cutter or your fingertips, blend until the mixture resembles coarse crumbs—think tiny peas with flecks of butter. Once the texture is right, drizzle in 2‑3 Tbsp ice water, one tablespoon at a time, mixing gently until the dough just holds together when pressed. Form the dough into a disc, wrap it in plastic, and chill for at least 30 minutes; this rest period relaxes the gluten and keeps the butter solid for a flaky crust.
While the dough chills, preheat your oven to 375°F (190°C). Roll the chilled dough on a lightly floured surface to a 12‑inch circle, then carefully transfer it into a 9‑inch pie pan, pressing gently to fit the edges. Trim any excess dough, and use a fork to prick the bottom all over—this prevents bubbling during blind‑baking. Line the crust with parchment paper and fill with pie weights or dried beans to keep it flat.
Kitchen Hack: If you don’t have pie weights, use a handful of uncooked rice or lentils; they’ll do the job and you can repurpose them later.Bake the crust blind for 12‑15 minutes, then carefully remove the parchment and weights. Return the crust to the oven for another 5‑7 minutes, or until the edges turn a light golden brown and you can smell a faint nutty aroma. This double‑bake technique creates a barrier that keeps the later‑added coconut filling from soaking into the crust. Once baked, set the crust on a cooling rack and let it cool completely before filling—any residual heat will cause the custard to curdle.
Now for the custard: In a medium saucepan, combine 2 cups full‑fat coconut milk, 1 cup coconut cream, and ¾ cup granulated sugar. Warm the mixture over medium heat, stirring until the sugar fully dissolves and the liquid is just beginning to steam. In a separate bowl, whisk together 4 large egg yolks with ¼ cup cornstarch until smooth; this mixture will thicken the custard without creating lumps.
Watch Out: When tempering the egg yolks, pour the hot coconut mixture into the yolks slowly while whisking constantly; a sudden temperature shock will scramble the eggs.Once the yolk mixture is tempered, return it to the saucepan and cook over low heat, stirring constantly with a silicone spatula. The custard will begin to thicken after a few minutes—watch for the point where it coats the back of the spoon and leaves a clean trail. At this stage, stir in 1 tsp vanilla extract and ½ cup sweetened shredded coconut, letting the coconut toast slightly in the warm custard for an extra layer of flavor. Remove from heat and let the custard cool for about 10 minutes before pouring it into the pre‑baked crust.
Cover the filled pie with a sheet of plastic wrap, pressing the wrap directly onto the surface of the custard to prevent a skin from forming. Refrigerate the pie for at least 2 hours, or until the filling is fully set and firm to the touch. While the pie chills, whip the topping: In a chilled bowl, combine 1 cup heavy cream, 2 Tbsp powdered sugar, 1 tsp vanilla extract, and a pinch of cream of tartar. Beat on medium‑high speed until soft peaks form—don’t over‑whip, or you’ll end up with butter.
Kitchen Hack: Chill the mixing bowl and whisk for 15 minutes before whipping; the cold environment gives you more volume with less effort.When the pie is set, spread the whipped cream in an even layer over the top, using a spatula to create smooth swirls or decorative peaks—your choice. Sprinkle the toasted coconut flakes generously, pressing them lightly into the cream so they adhere. If you love a little extra drama, drizzle a teaspoon of dark rum over the toasted coconut; the alcohol will evaporate slightly, leaving a lingering depth of flavor.
Give the pie a final chill for 15 minutes to let the topping set and the flavors meld. Then, slice with a hot, wet knife—dip the blade in hot water, wipe it dry, and cut. This technique ensures clean slices that don’t crumble, giving each piece a perfect cross‑section of crust, custard, and cloud‑like cream.
That’s it — you did it. But hold on, I've got a few more tricks that'll take this to another level, like adding a dash of lime zest for brightness or a whisper of sea salt on the whipped topping to balance the sweetness. Trust me, once you’ve tasted this, you’ll never settle for a store‑bought version again. Enjoy, and remember: the best part of baking is sharing, so don’t be shy about sending a slice (or the whole pie) to a friend who needs a tropical pick‑me‑up.
Insider Tricks for Flawless Results
The Temperature Rule Nobody Follows
Never bake a crust with cold ingredients straight out of the fridge; let the dough sit at room temperature for 5‑10 minutes before rolling. This small warmth prevents the butter from cracking, which can lead to uneven flaking. I once baked a crust straight from the freezer and ended up with a brittle, cracked bottom that looked like a road map. The lesson? Warm dough = smoother roll = flawless crust.
Why Your Nose Knows Best
When the custard is thickening, rely on scent rather than a timer. The moment you catch that faint caramel‑nut aroma, you know the starch has fully gelatinized and the mixture is ready. If you wait too long, the custard can become grainy; if you stop too early, it’ll be runny. Trust your nose, and you’ll always hit that perfect, glossy sheen.
The 5‑Minute Rest That Changes Everything
After pouring the custard into the crust, let it sit at room temperature for exactly five minutes before refrigerating. This short pause allows the filling to settle, reducing the formation of a surface skin. My first batch skipped this step, and the top developed a dull film that made the whipped cream look sad. Five minutes is all it takes to keep the surface silky.
Whip Like a Pro
Use a chilled metal bowl and whisk for the whipped topping; the cold metal accelerates fat solidification, giving you more volume. Add a pinch of cream of tartar—this acid stabilizes the foam, so your peaks stay upright for hours. I once tried to skip the tartar, and the cream collapsed within minutes, turning my elegant garnish into a soupy mess.
Toasting Coconut the Right Way
Toast shredded coconut over medium heat, stirring constantly, until the edges turn a deep amber. The key is to keep the pan moving; otherwise, you’ll get burnt bits that taste bitter. A quick sniff will tell you when it’s ready—there’s a sweet, nutty perfume that fills the kitchen, signaling you’ve hit the sweet spot.
Creative Twists and Variations
This recipe is a playground. Here are some of my favorite ways to switch things up:
Mango‑Infused Dream
Blend ½ cup of pureed ripe mango into the custard before cooking. The tropical mango adds a bright, citrusy note that pairs beautifully with the coconut base, turning the pie into a summer vacation on a plate. Perfect for those who love a fruit‑forward twist.
Chocolate Coconut Fusion
Melt ¼ cup dark chocolate and swirl it into the custard just before pouring it into the crust. The bittersweet chocolate balances the coconut’s sweetness, creating a sophisticated flavor duo that’s ideal for date night.
Spiced Rum Rum‑Runner
Add 2 Tbsp dark rum and a pinch of ground nutmeg to the custard. The rum deepens the coconut flavor, while nutmeg adds a warm spice that evokes a cozy holiday vibe—great for cooler evenings.
Vegan Velvet
Swap the butter for coconut oil, use coconut cream and full‑fat coconut milk for the filling, and replace the egg yolks with a blend of silken tofu and cornstarch. Whip coconut‑based cream with a little aquafaba for the topping. The result is a fully plant‑based pie that still delivers that luxurious mouthfeel.
Lime Zest Brightness
Stir 1 tsp freshly grated lime zest into the whipped topping and sprinkle a few extra zest curls on top. The citrus lifts the richness, giving each bite a refreshing pop that cuts through the sweetness.
Storing and Bringing It Back to Life
Fridge Storage
Cover the pie loosely with plastic wrap and store it in the refrigerator for up to 48 hours. The custard will stay firm, and the whipped topping retains its fluffiness. If you notice the topping starting to soften, give it a quick whisk before serving.
Freezer Friendly
Wrap the entire pie (or individual slices) in a double layer of aluminum foil, then place it in a freezer‑safe bag. It will keep for up to 2 months. When you’re ready to enjoy, thaw it in the fridge overnight and add a fresh dollop of whipped cream to revive the texture.
Best Reheating Method
If you prefer a warm slice, place a single serving on a microwave‑safe plate, add a tiny splash (about 1 tsp) of water, and heat for 15‑20 seconds. The steam generated re‑hydrates the custard, giving it a silky finish without drying out the crust. For a stovetop approach, warm the slice gently in a skillet over low heat, covered, for 2‑3 minutes.