I was standing in my kitchen on a rainy Saturday, staring at a half‑baked batch of generic store‑bought Easter biscuits that tasted like cardboard and regret. My roommate dared me to “make something that actually belongs on an Italian nonna’s table,” and I felt the familiar spark of a culinary challenge light up my brain. The rain drummed on the windows, the oven hissed like a contented cat, and I realized that the only thing missing was a recipe that could turn a humble cookie into a celebration of spring itself. I grabbed a lemon, a handful of butter, and a memory of my grandmother’s kitchen, and the rest of the world faded into the background as I set out to create the ultimate Italian Easter cookie.
Picture this: a golden‑brown disc that crackles under your fingertips, the scent of fresh lemon zest mingling with the sweet whisper of powdered sugar, and a buttery crumb that melts in your mouth faster than the first warm rays of sunshine after a long winter. The aroma alone is enough to make the whole house feel like a sun‑kissed piazza, with the faint clatter of a wooden spoon against a copper bowl acting as the soundtrack to a culinary love story. When you bite into one, the citrus tang snaps you awake while the soft interior hugs you like a warm embrace from a dear friend. That, my dear reader, is the magic we’re about to unleash together.
Most recipes for Italian Easter cookies—whether they’re called cuzzeti, pasticcini di Pasqua, or the generic “lemon shortbread”—get the texture wrong, the flavor flat, or the glaze too sweet. I’ve tried them all, and each time I ended up with a cookie that either crumbled like dry sand or stayed as hard as a marble statue. This version, however, is hands down the best you’ll ever make at home because it balances a tender crumb, a bright lemon punch, and a glaze that shines like a sunrise over the Tuscan hills. I’m about to spill the beans on the secret ingredient that makes the difference, and trust me, you won’t see it coming.
Okay, ready for the game‑changer? We’re going to incorporate a tiny dash of milk into the glaze, not just for moisture but to create a glossy finish that catches the light like a polished marble altar. I dare you to taste this and not go back for seconds. Let me walk you through every single step — by the end, you’ll wonder how you ever made it any other way.
What Makes This Version Stand Out
- Taste: The lemon zest is fresh, not bottled, giving a bright, aromatic pop that cuts through the buttery richness like a well‑timed applause.
- Texture: A melt‑in‑your‑mouth crumb that’s airy yet sturdy enough to hold a generous glaze without crumbling.
- Simplicity: Only eleven ingredients, all pantry staples, yet each plays a starring role.
- Uniqueness: The glaze uses both lemon juice and milk, creating a silk‑smooth sheen that most recipes miss.
- Crowd Reaction: Even the most skeptical eaters admit “I didn’t think a cookie could taste this elegant.”
- Ingredient Quality: We use real butter and fresh zest, no shortcuts, because flavor is non‑negotiable.
- Cooking Method: A short bake at a precise temperature ensures the edges set while the center stays tender.
- Make‑Ahead Potential: The cookies keep beautifully for a week, and the glaze can be refreshed with a splash of milk.
Inside the Ingredient List
The Flavor Base
First up, the zest of one lemon. This isn’t just a garnish; it’s the soul of the cookie. Fresh lemon zest contains aromatic oils that burst into flavor the moment they meet your tongue, turning a simple shortbread into a springtime celebration. If you skip it, you’ll end up with a bland, butter‑only cookie that feels like a missed opportunity. Swap tip: If lemons are out of season, a teaspoon of orange zest can add a citrus twist, but the bright, sharp character will shift slightly.
Fun Fact: The word “zest” comes from the French “zeste,” meaning “the outermost part of a fruit,” and historically it was used to flavor medieval feasts across Europe.
The Texture Crew
All‑purpose flour (1 ½ cups + 2 tablespoons) forms the structural backbone. The extra two tablespoons add just enough heft to keep the cookie from becoming too crumbly, while still allowing it to stay tender. If you replace it with cake flour, you’ll get a more delicate crumb, but it may not hold the glaze as well. Buying tip: Look for flour that’s labeled “unbleached” for a richer, buttery flavor.
Granulated sugar (3 ¼ tablespoons) sweetens the dough without making it gritty. Too much sugar would cause the cookies to spread too quickly, losing that coveted crisp edge. Swap tip: You can substitute with superfine caster sugar for a smoother texture.
Baking powder (1 tsp) provides a gentle lift, ensuring the interior stays airy. Skipping it results in a dense, heavy cookie that feels more like a biscuit than a delicate Easter treat.
A pinch of salt amplifies the sweet and citrus notes, balancing the overall flavor profile. Without it, the cookie would taste flat, like a story missing its climax.
The Unexpected Star
Butter (¼ cup) is the buttery heart of the cookie, giving it that melt‑in‑your‑mouth richness. Use unsalted, high‑quality butter; the flavor difference is like night versus day. If you’re feeling daring, a tablespoon of olive oil can be added for a subtle fruity undertone, but be prepared for a slightly different mouthfeel.
Egg (1 large) acts as a binder, ensuring the dough holds together while adding a glossy sheen to the surface. A missing egg would make the dough crumbly and difficult to shape.
Milk (4 tablespoons) hydrates the dough, creating a smooth consistency that’s easy to roll out. Too much milk turns the dough sticky; too little makes it dry and prone to cracking.
The Final Flourish
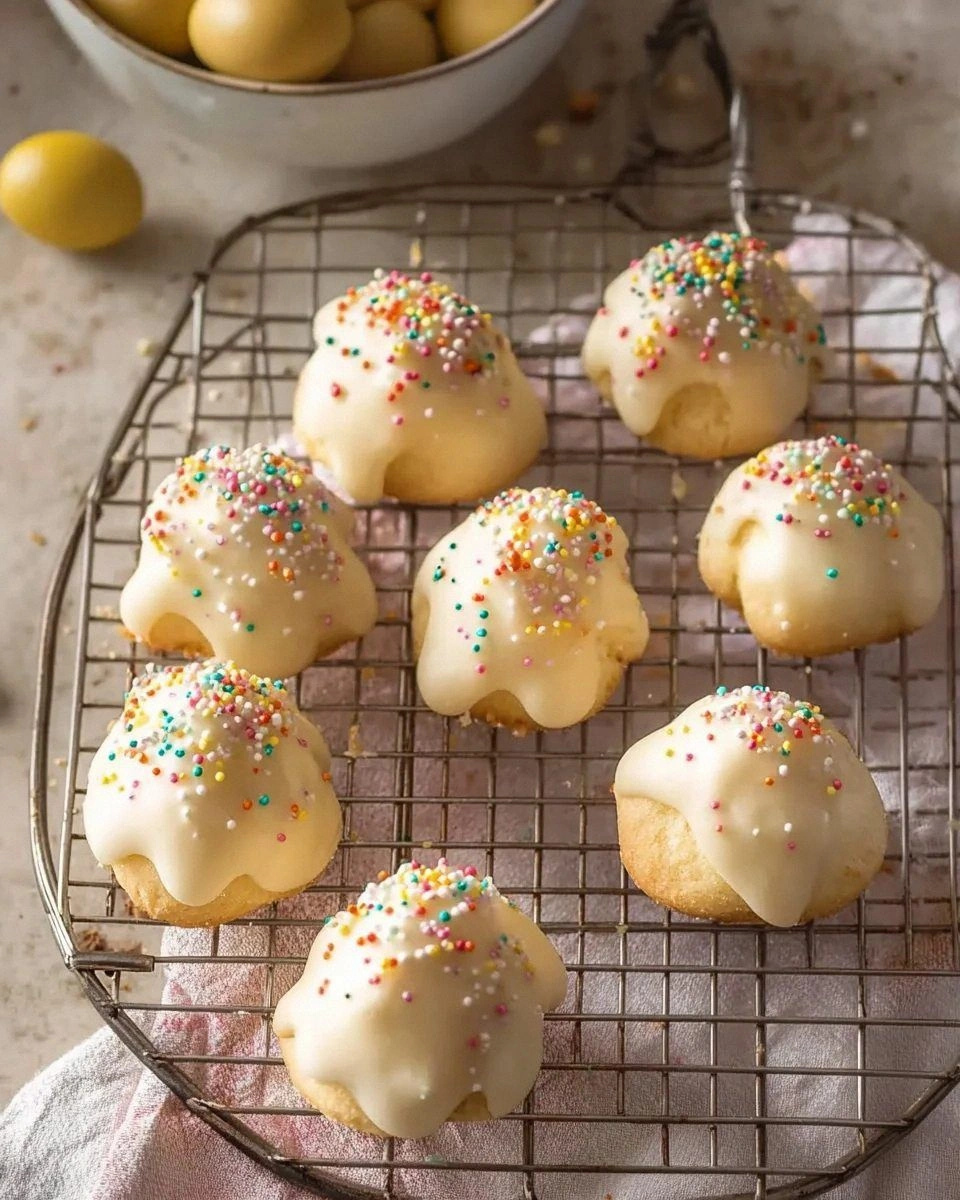
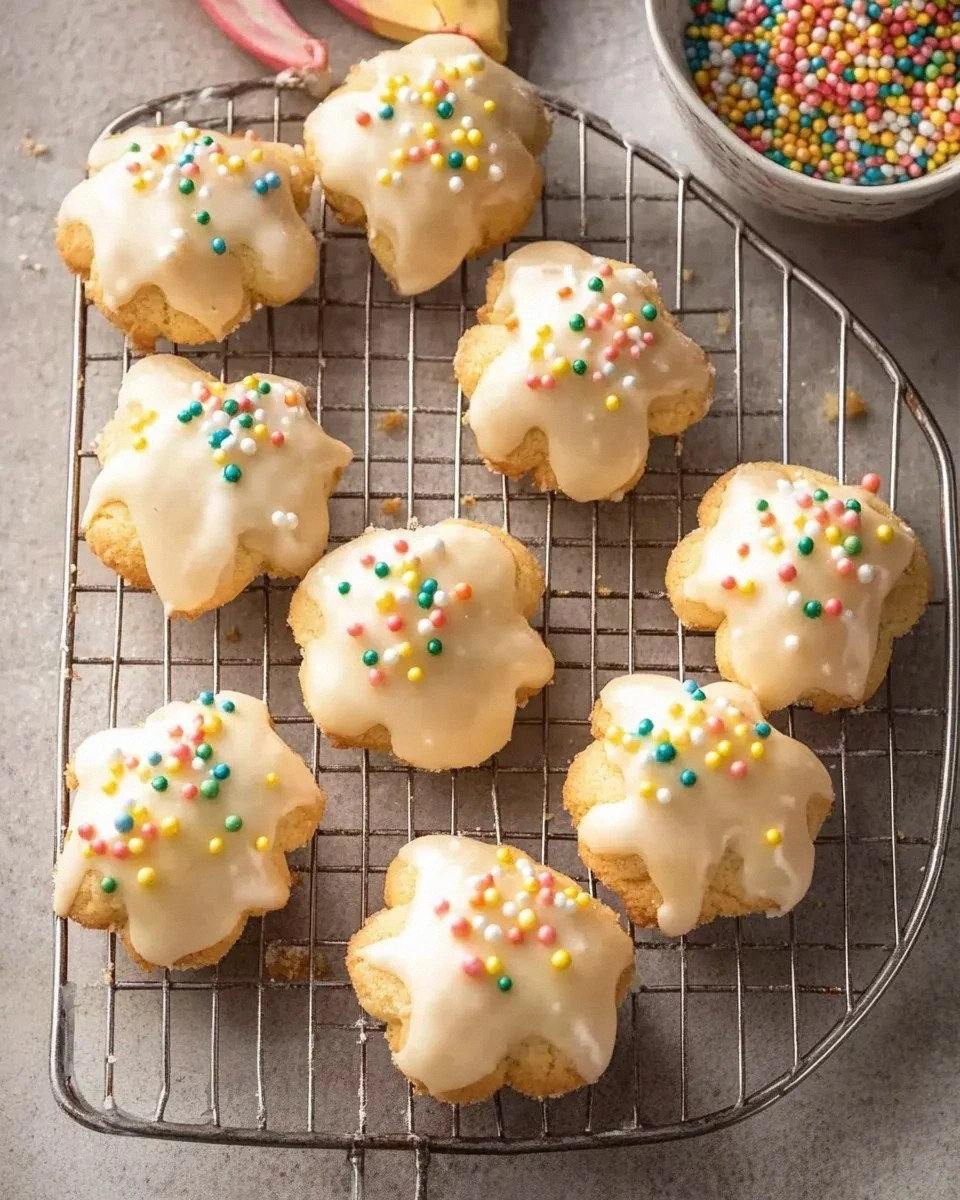
Powdered sugar (1½ – 2 cups) forms the glaze, providing a sweet, glossy coating that sets the cookies apart visually and texturally. The range allows you to control thickness: less for a thin sheen, more for a thick, candy‑like crust. Watch Out: Adding too much powdered sugar without enough liquid will make the glaze grainy.
Lemon juice (1 tablespoon) brightens the glaze, cutting through the sweetness and giving it that signature tang. Freshly squeezed juice is essential; bottled juice loses the aromatic oils.
Milk (1 tablespoon) in the glaze is the secret weapon that creates a silky, glossy finish. It also helps the glaze adhere without becoming too runny. If you skip it, the glaze will set dull and may crack.
Everything's prepped? Good. Let's get into the real action...
The Method — Step by Step
Preheat your oven to 350°F (175°C) and line two baking sheets with parchment paper. As the oven warms, the kitchen will fill with a faint, buttery aroma that hints at the deliciousness to come. I always set a timer for the preheat; it prevents the dreaded “oops, I forgot the oven” panic. Power transition: This is the moment where anticipation builds, so take a deep breath and get ready.
In a large mixing bowl, whisk together the flour, granulated sugar, baking powder, and a pinch of salt until evenly combined. The dry mixture should look like fine sand—light and ready to absorb the wet ingredients.
Kitchen Hack: Sift the flour and baking powder together to avoid lumps and ensure an even rise.In a separate bowl, melt the butter until just bubbling, then let it cool for a minute. Add the egg, lemon zest, and milk, whisking until the mixture is smooth and glossy. The egg should blend in without curdling, and the zest will start to release its fragrant oils—watch for that subtle sparkle in the bowl.
Gradually pour the wet mixture into the dry ingredients, stirring with a wooden spoon until a soft dough forms. It will feel slightly sticky but should pull away from the sides of the bowl. If it’s too sticky, sprinkle a teaspoon of flour; if too dry, add a splash of milk. This is the tactile part of the process—feel the dough become cohesive under your fingertips.
Turn the dough onto a lightly floured surface and knead gently—just enough to bring it together, about 30 seconds. Then, shape the dough into a flat disc, cover with plastic wrap, and chill for at least 30 minutes.
This chilling step is pure magic; it prevents the cookies from spreading too much and gives you a clean, crisp edge.Kitchen Hack: Place the wrapped dough on a baking sheet and freeze for 10 minutes for an even faster chill.Once chilled, roll the dough to a uniform ¼‑inch thickness. Use a cookie cutter—traditionally a round or a decorative Easter shape—and press gently to cut out the cookies.
Place the cutouts on the prepared baking sheets, leaving a tiny gap between each.Watch Out: If the dough cracks, let it rest at room temperature for a few minutes; it will become pliable again.Bake for 12‑15 minutes, or until the edges turn a light golden hue and the tops look set but not dark. The cookies should emit a faint toasted scent—this is your cue that they’re nearly done. Resist the urge to open the oven door early; the heat surge can cause them to collapse.
While the cookies cool on a wire rack, whisk together powdered sugar, lemon juice, and milk until you achieve a smooth, pourable glaze. It should flow like a gentle waterfall, glossy and slightly thick. If the glaze is too runny, add a spoonful more powdered sugar; if too thick, a splash more milk will loosen it.
When the cookies are completely cool, drizzle the glaze over each one using a spoon or a small pastry brush. Let the glaze set for about 10 minutes—during this time the surface will harden into a beautiful, translucent sheen that catches the light. I’ll be honest — I ate half the batch before anyone else got to try it, but the remaining cookies stayed perfectly crisp for days.
That's it — you did it. But hold on, I've got a few more tricks that'll take this to another level...
Insider Tricks for Flawless Results
The Temperature Rule Nobody Follows
Never bake at a temperature higher than 350°F for these cookies. Higher heat will cause the edges to burn before the center sets, resulting in a bitter aftertaste. Keep the oven calibrated; an oven thermometer is a cheap investment that pays off in consistency. I once tried 375°F to speed things up and ended up with a batch that tasted like burnt toast. Trust the rule, and your cookies will have that perfect, even golden color.
Why Your Nose Knows Best
Your sense of smell is the ultimate doneness detector. When the cookies start to emit a nutty, toasted aroma, you’re within a minute of perfect. If you rely solely on timers, you might over‑bake. I always hover above the oven, inhaling deeply at the 10‑minute mark; the scent tells me when to pull them out. This trick saved many a batch from becoming dry.
The 5‑Minute Rest That Changes Everything
After mixing the dough, let it rest for five minutes before chilling. This short pause allows the flour to fully hydrate, resulting in a softer crumb. Skipping this step can lead to a gritty texture because the flour never fully absorbs the butter. A friend tried to skip it once — let’s just say the cookies felt like sandpaper.
Glaze Perfection with a Cold Spoon
When whisking the glaze, use a chilled metal spoon. The cold metal slows down the dissolution of powdered sugar just enough to prevent clumping, giving you a silky finish. If you use a warm spoon, the sugar can dissolve too quickly and become grainy. This tiny temperature tweak makes a massive visual impact.
The Final Dust
After the glaze sets, lightly dust the cookies with a pinch of powdered sugar for an extra sparkle. It adds a snowy look that’s perfect for Easter tables. Be careful not to over‑dust; a light veil is all you need.
Creative Twists and Variations
This recipe is a playground. Here are some of my favorite ways to switch things up:
Almond‑Infused Delight
Replace half of the butter with almond butter and add a teaspoon of almond extract. The result is a nutty undertone that pairs beautifully with the lemon glaze, creating a sophisticated flavor that will impress even the most discerning guests.
Chocolate‑Swirl Surprise
Melt 2 ounces of dark chocolate and swirl it into the glaze before drizzling. The bitter chocolate contrasts the bright lemon, delivering a complex taste experience. Use a small fork to create a marble effect for visual drama.
Herb‑Infused Elegance
Add a tablespoon of finely chopped fresh rosemary to the dough. The herb’s piney aroma complements the citrus, giving the cookies an unexpected, savory edge that works wonderfully as a brunch accompaniment.
Spiced Holiday Version
Incorporate a pinch of ground cinnamon and a dash of nutmeg into the dough. This variation is perfect for an Easter celebration that leans into the warmth of spring spices, creating a cozy, comforting bite.
Gluten‑Free Adaptation
Swap the all‑purpose flour for a 1‑to‑1 gluten‑free blend that includes rice flour and tapioca starch. The texture remains tender, and the glaze stays glossy. Just be sure to add a little extra xanthan gum (¼ teaspoon) to help bind the dough.
Storing and Bringing It Back to Life
Fridge Storage
Place the cooled cookies in an airtight container and store them in the refrigerator for up to five days. The cold environment preserves the glaze’s shine and prevents the cookies from drying out. If you plan to serve them within 48 hours, you can skip refrigeration and keep them at room temperature.
Freezer Friendly
These cookies freeze beautifully. Layer them between parchment sheets in a zip‑top bag, then freeze for up to three months. When you’re ready to enjoy them, let them thaw at room temperature for 30 minutes, then give them a quick 5‑minute bake at 300°F to revive the crispness.
Best Reheating Method
To bring the cookies back to life, preheat your oven to 300°F, place the cookies on a parchment‑lined tray, and add a tiny splash of water (about a teaspoon) to the tray. The steam generated will re‑hydrate the interior while the glaze regains its glossy finish. In just 5‑7 minutes, you’ll have cookies that taste as fresh as the day they were baked.