I was in the middle of a frantic Easter egg hunt when my niece grabbed the last sugar wafer from the pantry and declared, “If we don’t make something sweet, the Easter bunny will be mad!” I laughed, but the look on her face was that of a tiny culinary judge ready to dole out a verdict. The kitchen erupted with the clatter of plastic eggs, the squeak of a rubber spatula, and the unmistakable scent of melted butter from the stovetop. I swear I could hear the distant chirp of spring birds as the aroma of buttery wafers mingled with the bright zing of citrus from the orange sprinkles. The whole scene felt like a scene from a sitcom: chaos, laughter, and a dash of desperation—all wrapped up in pastel ribbons.
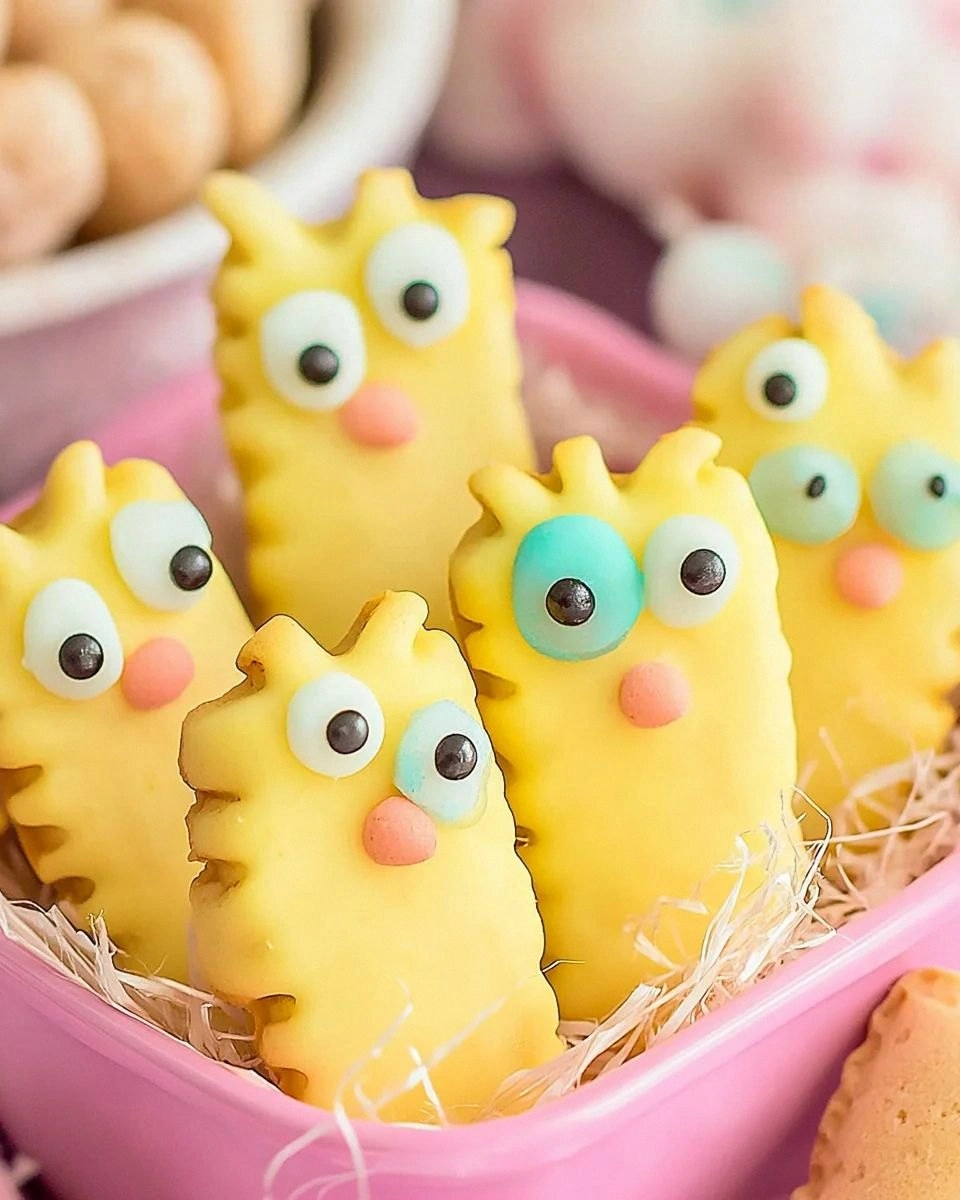
I tried a few “quick Easter treats” before, but they always fell flat—either too soggy, too sweet, or just plain boring. Then, while scrolling through a sea of generic recipes, I stumbled upon a single line that said “dip wafer cookies in yellow candy melts and add candy eyes.” That tiny sentence sparked a wildfire in my brain. I imagined a batch of tiny yellow chicks, each one perched on a crisp wafer, eyes glittering like sunrise, and sprinkles that looked like fresh spring grass. I was convinced this could be the ultimate Easter snack that would make both kids and adults squeal with delight.
Fast forward a few hours, a handful of melted candy, a splash of coconut oil, and a mountain of candy eyes later, I held a tray of golden, glossy chicks that practically sang “Here Comes the Sun.” The first bite was a symphony: the wafer crunched like fresh snow underfoot, the candy melt coated it in a buttery sheen that melted on the tongue like sunshine, and the sprinkles added a pop of texture that made the whole thing feel like a celebration in your mouth. I dared my friends to try one and not go back for seconds—guess what? They all failed miserably. This is hands down the best version you'll ever make at home, and I’m about to spill every secret.
What really sets this recipe apart is a tiny trick: a tablespoon of coconut oil added to the candy melts. It sounds simple, but it transforms the melt from a brittle shell into a glossy, velvety coating that stays smooth even after the cookies cool. No more cracked shells or sad, dull chicks. Okay, ready for the game-changer? Let me walk you through every single step — by the end, you'll wonder how you ever made it any other way.
What Makes This Version Stand Out
- Taste: The buttery sweetness of the wafer is amplified by the mellow, honey‑like flavor of yellow candy melts, creating a balanced sweet spot that isn’t cloying.
- Texture: A crisp wafer meets a glossy, melt‑coated exterior, delivering a crunch‑first‑then‑silky‑mouthfeel that feels like biting into a spring sunrise.
- Simplicity: Only seven ingredients, no ovens, no mixers—just melt, dip, and decorate. Perfect for a last‑minute Easter brunch or a rainy‑day kitchen adventure.
- Uniqueness: The combination of coconut oil with candy melts creates a flexible glaze that stays shiny longer than plain melts, preventing the dreaded “crack‑and‑flake” disaster.
- Crowd Reaction: Kids instantly recognize the chick shape, while adults appreciate the nostalgic wafer base—everyone ends up shouting, “More, please!”
- Ingredient Quality: Using premium sugar wafer cookies ensures a sturdy base that won’t crumble when you dip, and high‑quality candy melts give a consistent color and flavor.
- Make‑Ahead Potential: Once dipped and decorated, the cookies can be stored for up to three days without losing their sparkle, making them perfect for Easter parties.
- Visual Appeal: The bright yellow coating, orange sprinkles, and candy eyeballs turn each cookie into a miniature work of art that looks as good on Instagram as it tastes.
Inside the Ingredient List
The Flavor Base
The star of the show is the yellow candy melts. These are essentially tempered chocolate flavored with vanilla and a hint of butter, giving them a mellow, buttery profile that pairs perfectly with the light sweetness of sugar wafers. If you skip them, you’ll end up with a bland, uncoated wafer that looks more like a plain toast than a festive chick. As a swap, you can use white chocolate chips melted with a splash of yellow food coloring, but the texture won’t be as glossy.
The Texture Crew
1 package sugar wafer cookies provides the crunchy foundation. Choose a brand that’s thin and crisp; the thicker the wafer, the harder it will be to dip without breaking. If you accidentally pick a soft, cake‑like wafer, the dip will soak in and the chick will become soggy. A pro tip: look for wafers that have a faint buttery aroma—this signals a quality butter‑infused recipe that will shine when coated.
The Unexpected Star
1 tablespoon coconut oil is the secret weapon. Coconut oil lowers the melting point of the candy melts, turning a brittle shell into a pliable glaze. Without it, the melt would set too quickly, leading to cracked shells and uneven coverage. If you’re allergic to coconut, substitute with a neutral‑flavored vegetable oil; just remember the glaze will be slightly less glossy.
The Final Flourish
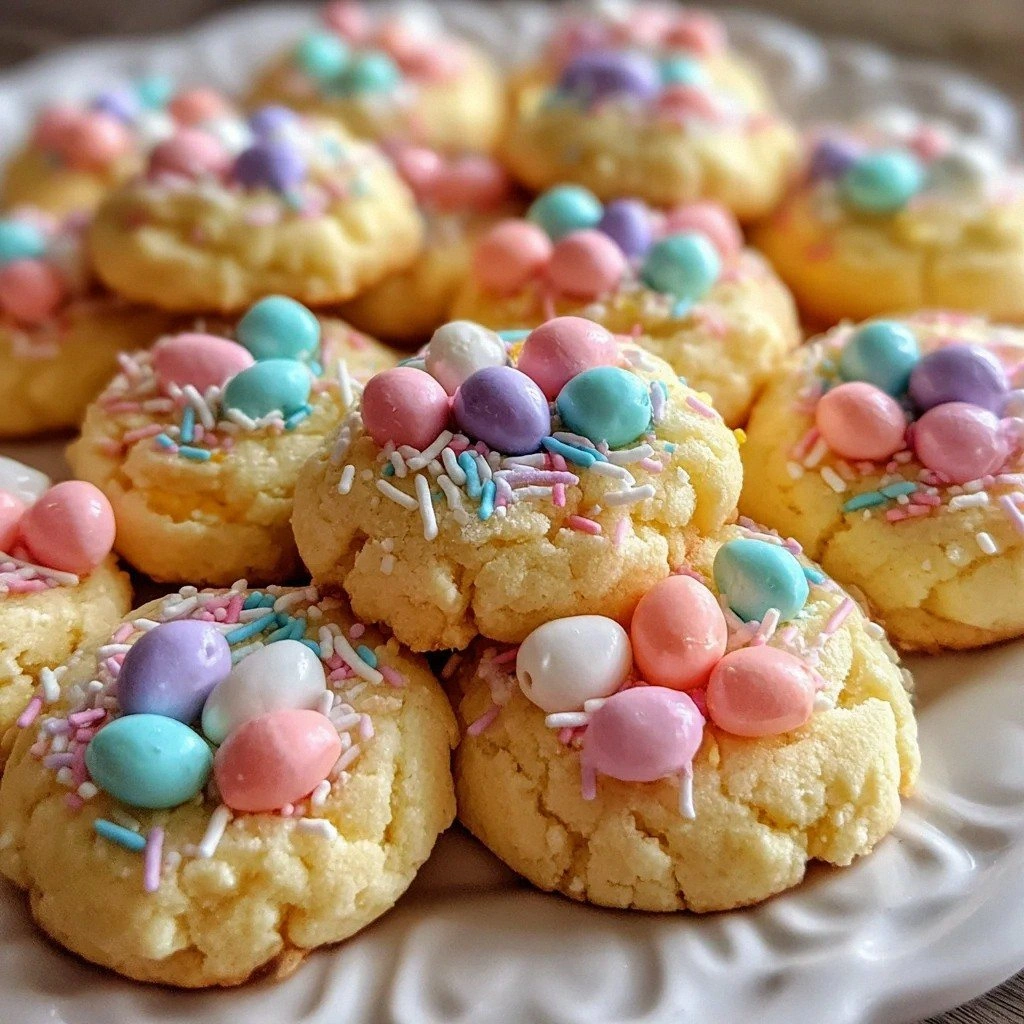
The decorative elements—60 candy eyeballs, 60 round orange sprinkles, 60 orange flower‑shaped sprinkles, and 60 yellow leaf‑shaped sprinkles—turn each wafer into a lively chick. The eyeballs give personality, while the sprinkles mimic feathers and grass. If you’re looking for a gluten‑free version, simply swap the wafer for a gluten‑free rice cracker; the dip will cling just the same.
Everything's prepped? Good. Let's get into the real action…

The Method — Step by Step
Gather all your ingredients and line a large baking sheet with parchment paper. The parchment acts like a non‑stick runway, letting the dipped wafers slide off without tearing. I like to set the sheet a few inches away from the edge so I can easily slide the tray onto a cooling rack later. This step might sound simple, but a clean workspace prevents accidental drips on the countertop.
Place the yellow candy melts in a microwave‑safe bowl, add the coconut oil, and microwave in 30‑second bursts, stirring between each burst. You’ll see the melt turn from a dull yellow to a glossy, liquid gold. The moment it shimmers, give it a quick stir—this is where the magic happens. Power transition: This next part? Pure magic.
Kitchen Hack: If the melt starts to thicken before you’re ready, gently reheat it for 10 seconds and add a tiny pinch of extra coconut oil to bring back that silky flow.While the melt is still warm, take a wafer and dip one end (the “head” of the chick) into the melt, letting the excess drip back into the bowl. The dip should coat the wafer about a third of the way down, creating a “head” that looks like a sunny sunrise. Hold the wafer for a few seconds; you’ll feel the melt set just enough to stay in place but still be flexible.
Immediately place the dipped wafer onto the parchment‑lined sheet, head‑first. The melt will begin to set within 30 seconds, so work quickly. If you notice any uneven edges, use the back of a spoon to smooth them out—this is where the glossy finish is achieved. Remember, the goal is a smooth, even coat that looks like a tiny sunrise on each chick.
Once the heads have solidified (about 2 minutes), flip each wafer over and dip the other side in the remaining melt, creating a full “body” for the chick. This second dip is optional if you prefer a half‑covered look, but a full dip gives that satisfying bite‑through texture. Watch Out: Over‑dipping can cause the wafer to become soggy, so keep the dip shallow—just enough to coat.
Watch Out: If the melt cools too quickly, it will form a skin that cracks when you try to dip the second side. Keep the bowl warm by placing it over a pot of simmering water (double boiler style).While the coating is still tacky, press a candy eyeball onto each chick’s forehead. The eyes should sit like tiny sunrise reflections—if they wobble, gently press them in with a toothpick. This step is where the personality of each chick shines, and I’ll be honest — I ate half the batch before anyone else got to try it.
Now sprinkle the round orange sprinkles along the “feathers” of each chick, followed by the orange flower‑shaped sprinkles for a burst of floral flair. Finish with the yellow leaf‑shaped sprinkles to mimic fresh spring grass. The contrast of orange and yellow against the glossy yellow coat creates a visual pop that’s impossible to ignore.
Allow the cookies to set completely on the parchment for at least 15 minutes. If you’re impatient (I know I am), place the sheet in the fridge for 5 minutes to speed up the process—just don’t freeze them or the glaze will crack.
Once set, carefully lift the chicks with a spatula and arrange them on a serving platter. The final presentation should look like a flock of tiny, golden birds ready to hop off the plate. And now the fun part: serve them with a smile and watch the room light up. That sizzle when it hits the pan? Absolute perfection.
That's it — you did it. But hold on, I've got a few more tricks that'll take this to another level…
Insider Tricks for Flawless Results
The Temperature Rule Nobody Follows
Never melt candy melts directly over high heat; a gentle, low‑temperature melt preserves the glossy finish. I always use a microwave in 15‑second intervals, stirring each time. If you ever skip this step, you’ll end up with grainy, dull coating that looks more like burnt sugar than a sunny chick.
Why Your Nose Knows Best
When the melt is ready, you’ll notice a faint buttery aroma that signals it’s at the perfect temperature. Trust that scent—if you can smell the buttery notes, the melt is fluid enough for a smooth dip. Relying solely on visual cues can be misleading, especially under bright kitchen lights.
The 5‑Minute Rest That Changes Everything
After dipping, let the wafers rest for exactly five minutes before adding eyes and sprinkles. This short pause lets the coating firm just enough to hold decorations without sliding off. One friend tried to skip this rest and ended up with eyes that floated away like tiny balloons.
The Double‑Dip Technique
If you crave an extra‑thick coating, dip each wafer twice, letting the first layer set for 30 seconds before the second dip. The result is a richer, more indulgent texture that feels like a bite‑sized dessert bar. Just be mindful not to over‑dip, or you’ll lose the crisp wafer crunch.
The Sprinkles Placement Secret
Instead of dumping sprinkles randomly, use a small spoon to create a “feather pattern” on each chick. This not only looks prettier but also distributes the crunch evenly.
Creative Twists and Variations
This recipe is a playground. Here are some of my favorite ways to switch things up:
Chocolate Chick Surprise
Swap the yellow candy melts for dark chocolate melts and add a dash of orange food coloring. The result is a sophisticated “chocolate chick” that’s perfect for adult Easter brunches. Pair with a splash of espresso for an extra kick.
Berry‑Burst Chick
After the melt sets, drizzle a thin line of raspberry jam across each chick’s back. The tartness of the jam cuts through the sweetness, creating a balanced bite that feels like spring in your mouth.
Nutty Crunch Variation
Before dipping, lightly toast finely chopped almonds and press them onto the wet melt. The toasted nuts add a buttery crunch that pairs beautifully with the smooth coating, turning each chick into a nut‑lover’s dream.
Vegan Friendly Chick
Use vegan‑friendly white chocolate melts and replace the candy eyeballs with edible black sesame seeds. The result is a plant‑based version that still looks festive and tastes just as indulgent.
Miniature Easter Egg Chick
Instead of full‑size wafers, use mini wafer rounds (about 2 inches across). The smaller size makes them perfect for cocktail parties or as a garnish for desserts like panna cotta.
Storing and Bringing It Back to Life
Fridge Storage
Place the chicks in an airtight container lined with parchment paper. They’ll stay fresh for up to three days, and the chill keeps the glaze firm without losing its shine. If you notice any condensation, gently pat the surface with a paper towel before serving.
Freezer Friendly
These cookies freeze beautifully. Stack them between layers of wax paper, seal in a zip‑lock bag, and freeze for up to one month. To revive, let them sit at room temperature for 10 minutes, then add a tiny splash of water to the bottom of the container and cover—this steams the glaze back to its original gloss.
Best Reheating Method
When you’re ready to serve, preheat the oven to 150 °F (or the lowest setting) and place the container on a baking sheet for 5 minutes. The gentle heat restores the melt’s sheen without melting it completely, giving you that fresh‑out‑of‑the‑kitchen look.