I still remember the Easter morning I nearly set my kitchen on fire trying to make those fancy layered cakes you see in magazines. Picture this: flour everywhere, egg shells in the batter, and a smoke alarm serenading the neighborhood at dawn. My family walked in expecting a Pinterest-worthy masterpiece and found me holding a charred pan like it was some kind of sacrificial offering. That was the moment I declared war on complicated Easter desserts and discovered these cookie bars that would change everything.
Fast forward to today, and these Easter Cake Mix Cookie Bars have become my secret weapon for every spring gathering. They're the dessert equivalent of that friend who shows up perfectly dressed with a bottle of wine and makes everyone wonder how they manage to look so put-together while you're still in your pajamas. The magic lies in their deceptively simple construction that delivers bakery-level results without the drama of traditional baking methods.
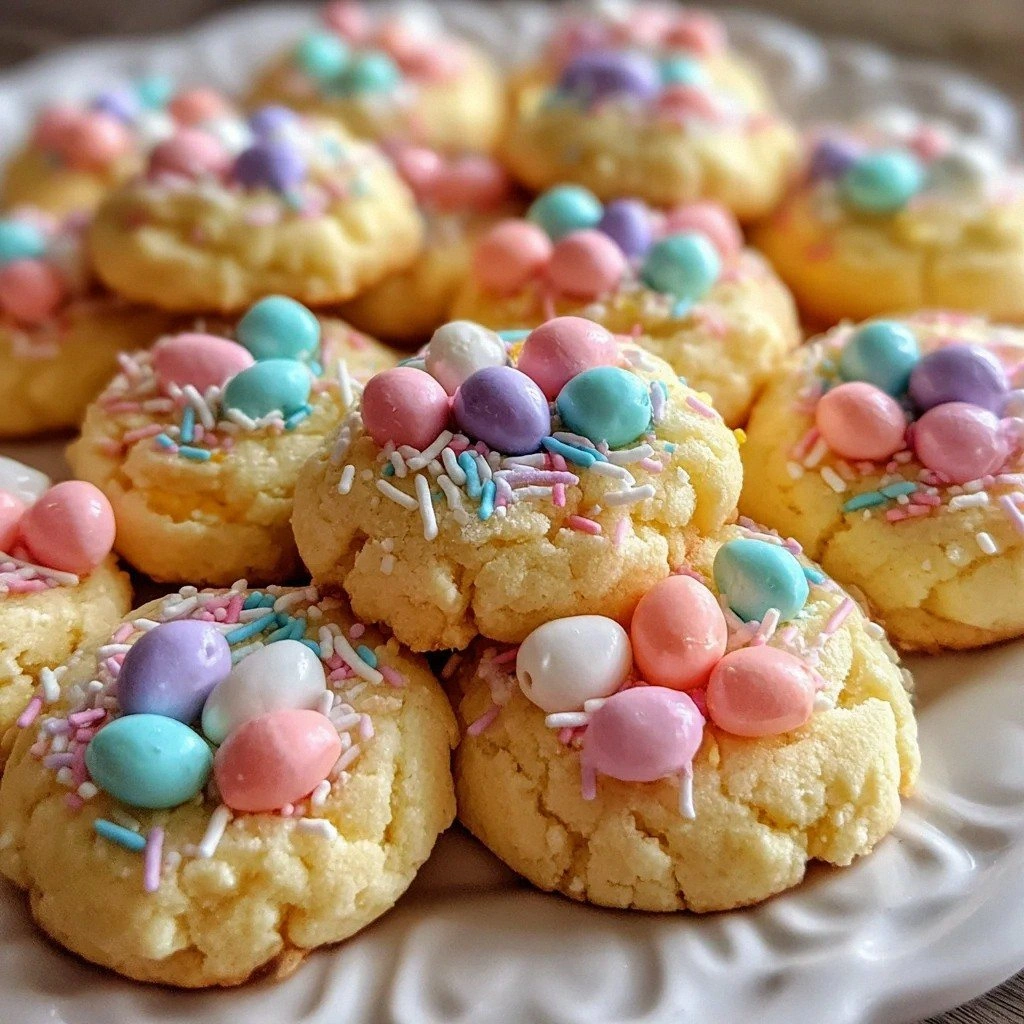
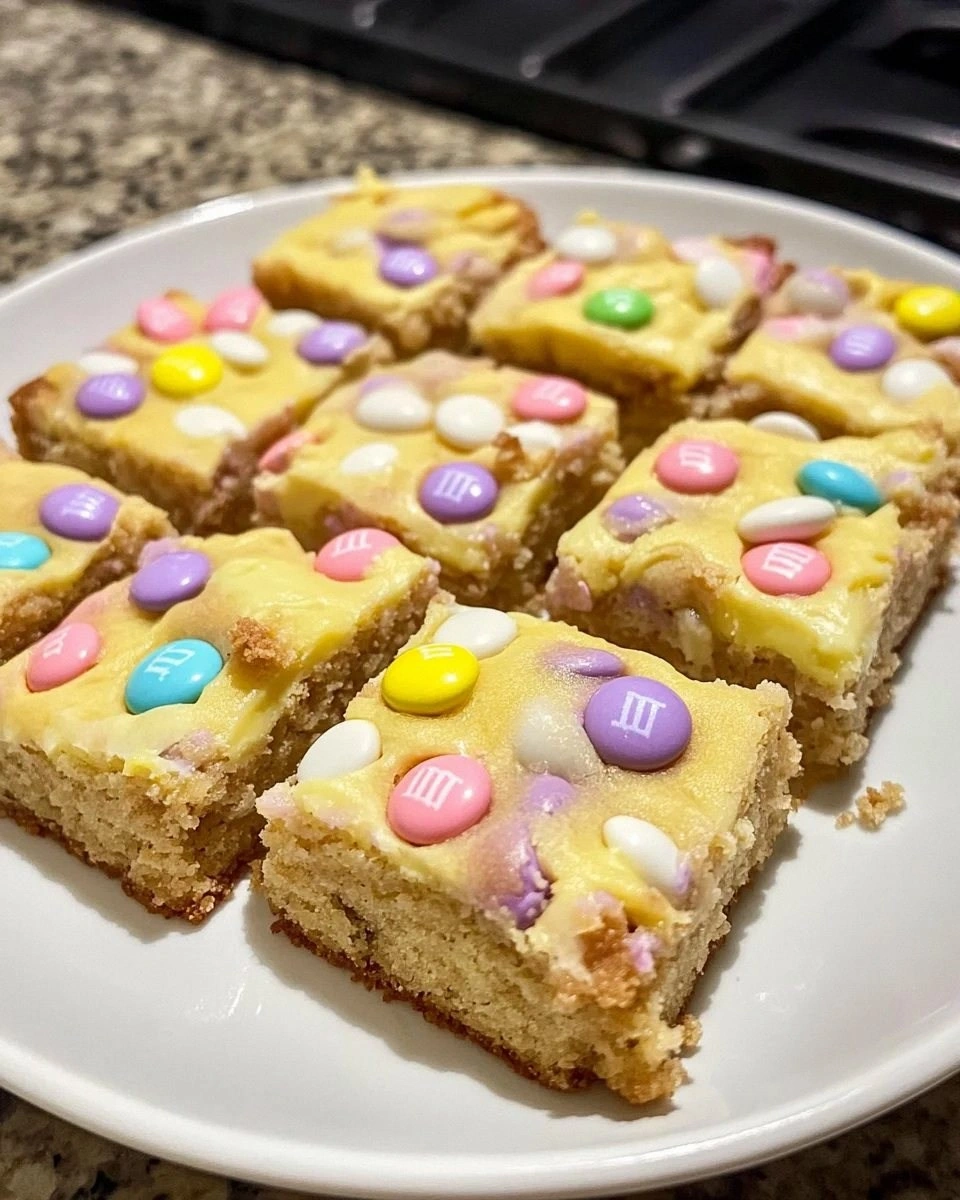
What makes these bars absolutely irresistible is how they manage to be everything at once: chewy like the center of a perfect cookie, tender like cake, and studded with pockets of melted white chocolate that create these gorgeous ribbons of sweetness throughout. The pastel M&M's don't just add color—they create these delightful candy-coated surprises that make each bite feel like finding Easter eggs hidden in a magical cookie forest.
Let me walk you through every single step — by the end, you'll wonder how you ever made it any other way. Trust me, once you master this technique, you'll be the person everyone begs to bring dessert to every spring gathering. And the best part? You'll actually want to make these again and again, not just because they're easy, but because they taste like pure childhood joy wrapped in grown-up sophistication.
What Makes This Version Stand Out
Before we dive into the kitchen, let me tell you why this isn't just another cake mix recipe collecting dust on the internet. This version is the result of three years of obsessive testing, countless batches, and me eating way more cookie bars than any nutritionist would recommend. I've tweaked every element until it hit that perfect sweet spot of being ridiculously easy while tasting like something from a boutique bakery.
- Speed Demon: From pantry to plate in under 45 minutes, these bars come together faster than you can decide what to wear to Easter brunch. While everyone else is wrestling with yeast breads and tempering chocolate, you'll be relaxing with a cup of coffee watching your bars cool on the counter.
- Texture Perfection: The edges develop this incredible caramelized crispness while the center stays lusciously soft and chewy. It's like getting two desserts in one pan — the best of both cookie and cake worlds without any of the usual compromises.
- Foolproof Technique: Using cake mix as the base eliminates all the usual baking variables that trip people up. No worrying about whether your baking powder is fresh or if you over-mixed the flour. This recipe is basically baking with training wheels, except the results look like you went to pastry school.
- Visual Impact: These bars slice into these gorgeous geometric pieces where every cross-section shows off the colorful candy pieces suspended in the white chocolate-speckled base. They're Instagram gold without any of that tedious decorating fuss that makes you question your life choices at 2 AM.
- Make-Ahead Magic: Mix up the dough, press it into the pan, cover with plastic wrap, and refrigerate for up to three days. When you're ready to bake, just pop it in the oven. This make-ahead flexibility means you can prep everything Saturday night and still sleep in Easter morning.
- Crowd Psychology: There's something about the combination of familiar cake mix flavor with the fun of candy pieces that makes people lose their minds. I've watched sophisticated adults fight over the last piece like it was the last lifeboat on the Titanic.
Alright, let's break down exactly what goes into this masterpiece...
Inside the Ingredient List
Every ingredient in this recipe pulls its weight and then some. I'm not one of those bakers who throws in random ingredients for the sake of sounding fancy. Each component has been tested, tasted, and approved by a panel of very enthusiastic taste testers (aka my neighbors who've learned to answer their doors when they see me coming with a baking pan).
The Foundation Builders
The cake mix isn't just a shortcut — it's the backbone that gives these bars their signature tender crumb. When you choose a high-quality vanilla or yellow cake mix, you're getting a perfectly balanced blend of flour, leavening agents, and flavorings that would take you forever to measure out yourself. Some brands are definitely better than others, and I've found that the ones with pudding in the mix create an even more luxurious texture. If you're feeling particularly fancy, the butter recipe yellow cake mix adds an extra layer of richness that makes people ask for your secret ingredient.
Melted butter might seem like a small detail, but it's what transforms these from ordinary cake mix bars into something extraordinary. The fat coats the flour particles, creating this tender, almost shortbread-like quality that makes each bite melt in your mouth. I always specify unsalted because different butter brands have wildly varying salt levels, and you want to control that balance yourself. Plus, there's something deeply satisfying about watching that golden butter swirl into the dry mix, knowing you're about to create something magical.
The Texture Magicians
Eggs are the unsung heroes of this recipe, working behind the scenes to bind everything together while adding structure and richness. Two large eggs hit the sweet spot — enough to create that perfect chewy texture without making the bars taste eggy or rubbery. I've tried this with extra large eggs and ended up with something that resembled a weird cookie omelet. Trust me, stick to the large eggs and your dental work will thank you.
Vanilla extract is where you shouldn't cheap out. That tiny teaspoon makes the difference between bars that taste artificial and ones that taste like they came from a high-end bakery. Real vanilla extract adds these complex floral notes that synthetic vanilla just can't replicate. It's like the difference between a beautiful symphony and someone playing chopsticks on a toy piano — both make sound, but only one makes your soul sing.
The Showstoppers
White chocolate chips are the secret weapon that takes these bars from good to absolutely legendary. As they melt during baking, they create these gorgeous pools of creamy sweetness that break up the texture and add visual appeal. The key is using good quality chips that actually contain cocoa butter, not the fake stuff that tastes like sweetened wax. When you bite into a warm bar and hit one of those melted pockets, it's like finding treasure.
Pastel M&M's aren't just pretty faces — they bring that perfect candy-coated crunch that contrasts beautifully with the soft bar base. The colors stay vibrant even after baking, creating these little jewels scattered throughout. Plus, there's something deeply nostalgic about M&M's that makes everyone feel like a kid again. Just try not to eat half the bag while you're baking. Okay, who am I kidding? Eat the M&M's. Live your best life.
The Grand Finale
Easter sprinkles are the confetti that turns these bars into a celebration. They add color, crunch, and that essential festive touch that makes them feel special. Not all sprinkles are created equal — the cheap ones bleed their colors and turn your bars into a muddy mess. Invest in good quality sprinkles that hold their shape and color. Your future self scrolling through Instagram will thank you when you see how gorgeous these look in photos.
Everything's prepped? Good. Let's get into the real action...
The Method — Step by Step
Now we're getting to the good stuff — the actual creation of these magical bars. Don't worry if you've never baked before or if your previous attempts have ended in smoke alarms and tears. This method is so forgiving, it's basically impossible to mess up. I've had my eight-year-old nephew make these with me, and even he couldn't destroy them (though he did try).
- Preheat and Prepare: Start by preheating your oven to 350°F (175°C). While it's heating, line a 9x13-inch baking pan with parchment paper, leaving some overhang on the sides. This overhang is your best friend later when you're lifting out the bars. Don't skip the parchment — it's the difference between bars that slide out like silk and bars that require a chisel and a prayer.
- The Melted Butter Magic: Melt your butter in the microwave or on the stovetop until it's completely liquid but not boiling hot. Hot butter can start cooking your eggs prematurely, and nobody wants scrambled egg bars. Let it cool for about two minutes — just enough time to measure out your other ingredients. The butter should feel warm to the touch but not burn-your-finger hot.
- Mix the Wet Base: In a large bowl, whisk together the melted butter, eggs, and vanilla extract until everything is beautifully combined. The mixture should look glossy and smooth, like liquid gold. This is where many people rush and end up with weird chunks of unincorporated egg. Take your time and whisk thoroughly — your arms might get a little workout, but the results are worth it.
- Bring in the Cake Mix: Dump the entire box of cake mix into your wet ingredients. Use a sturdy spatula or wooden spoon to mix everything together. At first, it'll look like a disaster — dry and crumbly and impossible. Keep mixing. After about 30 seconds of serious stirring, it transforms into this gorgeous dough that smells like vanilla clouds and childhood memories.
- Fold in the Goodies: Gently fold in the white chocolate chips, M&M's, and sprinkles. The key word here is gently. Over-mixing at this stage can break up the candy pieces and turn your beautiful colors into a muddy mess. Use a folding motion, like you're tucking a baby into bed, until everything is evenly distributed throughout the dough.
- Press and Prep: Transfer the dough to your prepared pan and press it evenly across the bottom. This is where having slightly damp hands helps — the dough won't stick to your fingers, and you can get it perfectly smooth. It should be about half an inch thick and look like a colorful mosaic of candy pieces. Take a moment to admire your handiwork before it goes into the oven.
- Bake to Perfection: Slide the pan into your preheated oven and bake for 20-25 minutes. The edges should be golden brown and slightly pulling away from the sides of the pan. The center will still look slightly soft — that's perfect. Over-baking is the enemy of chewy bars. When in doubt, pull them out a minute early rather than a minute late.
- The Cooling Crucial: Let the bars cool in the pan for at least 30 minutes before lifting them out using the parchment paper handles. This cooling time is when the magic happens — they firm up just enough to slice cleanly while staying soft and chewy. If you try to cut them while warm, you'll end up with a gooey mess that still tastes amazing but looks like abstract art.
- Slice and Serve: Once completely cool, lift the entire slab out and place it on a cutting board. Use a sharp knife to cut into squares or rectangles. The first cut is always the hardest, but once you get going, you'll have perfect little bars that look like they came from a professional bakery. Store any leftovers in an airtight container — though honestly, leftovers are a theoretical concept with these bars.
That's it — you did it. But hold on, I've got a few more tricks that'll take this to another level...
Insider Tricks for Flawless Results
After making these bars approximately 847 times (give or take), I've discovered some game-changing techniques that separate the good from the legendary. These aren't just random tips I pulled from the internet — these are hard-won secrets from my personal cookie bar laboratory, tested through trial, error, and many sugar highs.
The Temperature Rule Nobody Follows
Room temperature isn't just a suggestion — it's the secret handshake that gets you into the exclusive club of perfect cookie bars. When your eggs are room temperature, they incorporate more smoothly into the butter, creating an emulsion that results in more evenly textured bars. Cold eggs can cause the melted butter to seize up, creating little pockets of fat that mess with the final texture. Just set them out 30 minutes before you start, or if you're impatient like me, pop them in a bowl of warm (not hot) water for five minutes.
The same goes for your cake mix — believe it or not, room temperature dry ingredients incorporate better. If your pantry is particularly cold, just let the box sit on the counter while you prep everything else. This tiny step makes the difference between bars that have weird dry spots and bars that are perfectly uniform throughout.
Why Your Nose Knows Best
Forget timers — your nose is the most sophisticated piece of baking equipment you own. When these bars are perfectly done, your kitchen will smell like a vanilla cloud descended and decided to live in your oven. It's this intoxicating blend of butter, vanilla, and toasting sugar that makes your neighbors knock on your door asking what you're making. The moment you catch that scent, start checking for doneness. It's like having a built-in kitchen assistant who never lies to you.
I learned this the hard way after setting my timer for the maximum time and walking away, only to return to bars that were more suitable for building construction than eating. Your sense of smell is incredibly reliable once you learn to trust it. Plus, walking around sniffing the air like a bloodhound is a great way to make your family think you've finally lost it.
The 5-Minute Rest That Changes Everything
Here's where most people mess up — they try to cut into these bars the second they come out of the oven. I get it, the smell is driving you crazy and you're picturing warm, gooey cookie bar heaven. But patience, my friend, is the difference between Instagram-worthy squares and a Pinterest-fail disaster. Let them rest for exactly five minutes in the pan, then use the parchment to lift them onto a cutting board. They'll still be warm enough to enjoy the melty chocolate experience, but cool enough to slice cleanly.
This brief rest also allows the carryover cooking to finish the centers without over-baking the edges. It's like the bars are taking a little spa moment to gather themselves before their big debut. During this time, you can clean up your kitchen, make a cup of coffee, or just stand there drooling over what you're about to eat. No judgment here.
The Storage Secret That Keeps Them Fresh
Here's the thing — these bars actually get better after a day, if you can manage to keep them around that long. The flavors meld together in a way that creates this deeper, more complex taste profile. The key is storing them with a slice of bread in the container. The bread releases just enough moisture to keep the bars perfectly chewy without making them soggy. It's like having a tiny humidifier working 24/7 to maintain optimal cookie bar conditions.
Change the bread slice every day or two, and your bars will stay fresh for up to a week. Though honestly, if they last a week in your house, you have more self-control than every single person who's ever tried these. I've had friends hide them from their spouses, their kids, even themselves. They're that addictive.
Creative Twists and Variations
This recipe is a playground. Here are some of my favorite ways to switch things up:
The Chocolate Lover's Dream
Swap the vanilla cake mix for chocolate and replace the white chocolate chips with dark chocolate chunks. Add some chopped pecans for crunch and you've got a turtle-inspired bar that makes grown adults weep with joy. The contrast between the rich chocolate base and the pastel M&M's creates this gorgeous color-block effect that looks like modern art. My chocolate-obsessed friend calls these "the reason I have trust issues with regular cookies."
The Birthday Party Remix
Use funfetti cake mix instead of vanilla, add rainbow sprinkles instead of Easter ones, and throw in some mini marshmallows for extra celebration vibes. These are like eating a party — they're what happens when cookie bars and birthday cake have a beautiful baby. Kids go absolutely feral for these, and honestly, so do most adults after a few glasses of wine.
The Sophisticated Adult Version
Keep the vanilla base but add dried cranberries and white chocolate chips with chopped pistachios instead of M&M's. The result is this elegant bar that looks like it belongs in a Parisian café. The tart cranberries cut through the sweetness, and the pistachios add this sophisticated crunch that makes you feel fancy while you're eating cookies with your hands. Perfect for when you want to pretend you're a grown-up but still eat dessert for breakfast.
The Peanut Butter Explosion
Use yellow cake mix but add 1/2 cup of peanut butter to the wet ingredients. Use peanut butter chips instead of white chocolate and Reese's Pieces instead of M&M's. These taste like a peanut butter cup had a beautiful baby with a cookie bar. They're rich, decadent, and completely over-the-top in the best possible way. Warning: these are impossible to eat just one of, so plan accordingly or prepare for a stomach ache and zero regrets.
The Holiday Adaptation
This recipe works for absolutely every holiday — just switch up the candy colors. Red and green M&M's for Christmas, orange and black for Halloween, red and pink for Valentine's Day. It's like having one recipe that dresses up for every occasion. I've made these for every major holiday, and people always think I created something special just for them. The secret is that I'm lazy and brilliant in equal measure.
The Healthier-ish Version
Before you panic, I'm not suggesting we make these actually healthy — that would be a crime against dessert. But you can swap half the butter for coconut oil, use a reduced-sugar cake mix, and add some ground flaxseed for omega-3s. The bars still taste incredible but you can pretend you're being virtuous. It's like having your cake and eating it too, except it's cookie bars and you're still technically eating dessert. Sometimes we need these little lies to get through life.
Storing and Bringing It Back to Life
Fridge Storage
These bars keep beautifully in the refrigerator for up to a week. Store them in an airtight container with wax paper between layers to prevent sticking. The cold actually intensifies the flavors in a way that makes them even more addictive. Some people prefer them cold — the candy pieces get this satisfying snap when you bite into them, and the bars develop this almost fudge-like density that's incredible. If you're into meal prepping your desserts (no judgment), you can portion them out into individual containers so you have grab-and-go treats all week.
Freezer Friendly
Wrap individual bars tightly in plastic wrap, then place them in a freezer bag. They'll keep for up to three months, though mine have never lasted more than a week because I keep "forgetting" they're there and eating them frozen. Frozen bars are actually amazing — they're like cookie bar ice cream sandwiches without the ice cream. The texture becomes this dense, chewy candy that's completely different from the room temperature version but equally addictive. Just let them sit at room temperature for 10 minutes if you want them softer, or embrace the frozen candy bar experience.
Best Reheating Method
If you want to recreate that fresh-from-the-oven experience, wrap a bar in a damp paper towel and microwave for 10-15 seconds. The towel creates steam that rehydrates the bar without drying it out. You want it just warm enough to make the chocolate chips melty again but not so hot that it turns into a molten mess. Pro tip: add a tiny scoop of vanilla ice cream on top of a warm bar and prepare to enter dessert nirvana. It's like having a fresh-baked cookie experience with zero effort.