Picture this: a frantic Saturday morning, the kids are bouncing off the walls, the Easter basket is still half‑empty, and you’ve just realized you have nothing but a box of yellow cake mix and a pantry full of random sweets. I was in that exact spot, frantically scrolling through endless recipes, each promising “quick” or “easy” but delivering a soggy disappointment that made my kitchen smell like a burnt school cafeteria. I dared myself to turn that disaster into a triumph, and after a few frantic whisk‑whirls and a daring splash of vanilla, I emerged with a batch of cookie bars that could make even the most skeptical aunt gasp, “I dare you to taste this and not go back for seconds.”
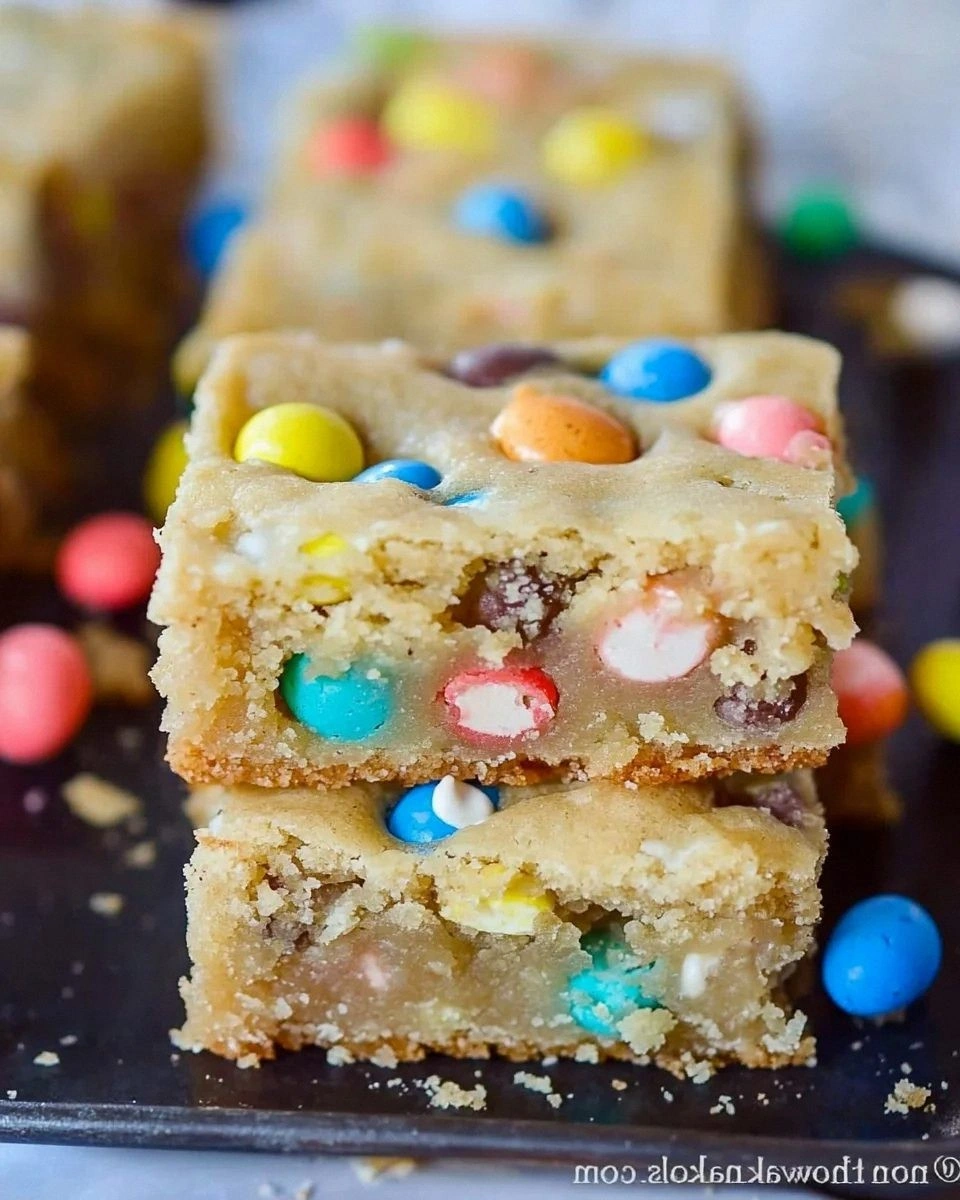
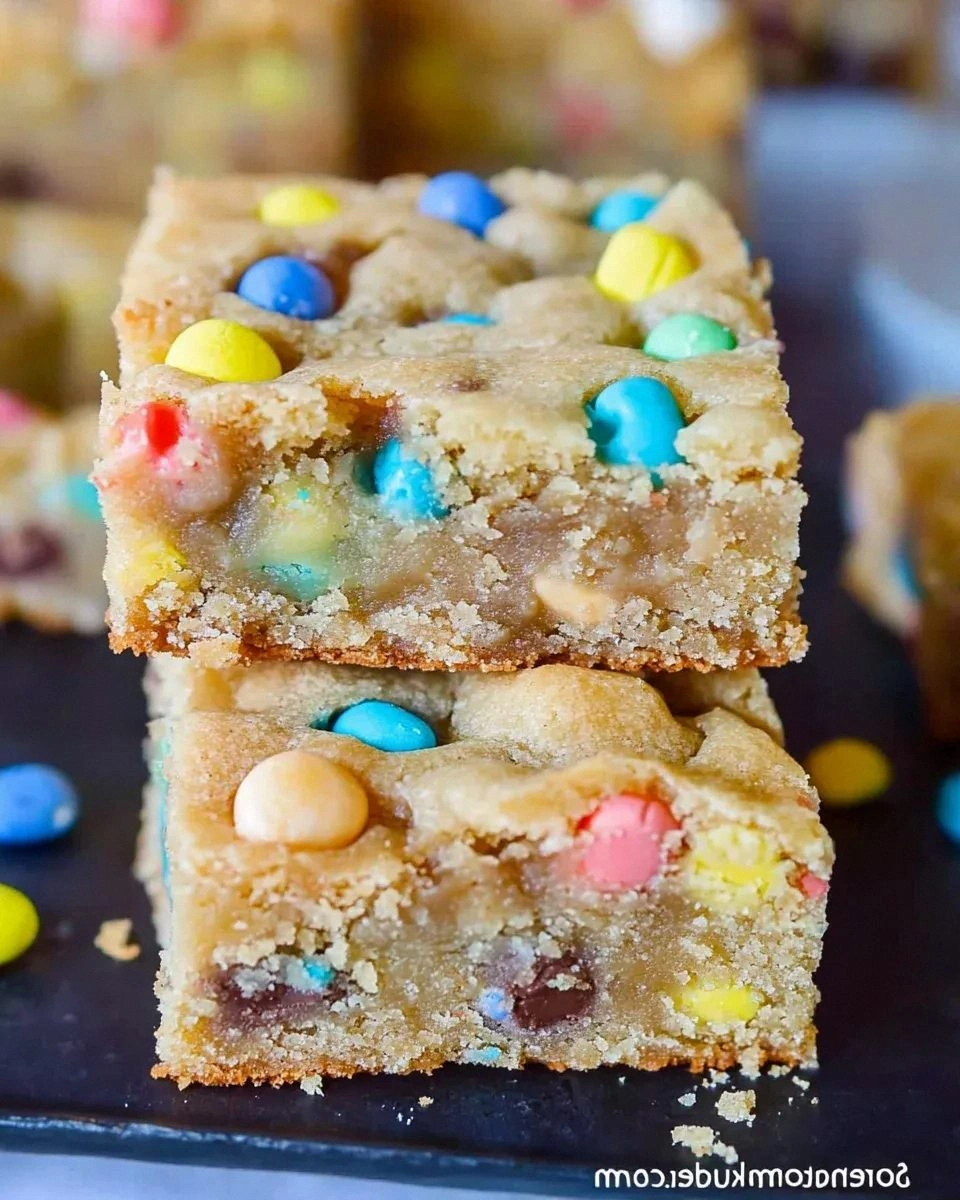
The moment those bars slid out of the oven, the whole house was hit with a wave of buttery, chocolatey perfume that made the air feel like a warm hug from spring itself. The golden edges were crisp enough to crack like thin ice, while the centers stayed soft and chewy, cradling a rainbow of Easter M&M candies that popped with every bite. I could hear the faint crackle of the chocolate chips as they melted into a glossy river, and the subtle hint of vanilla whispered through the sweet chaos like a secret lover. My fingertips tingled from the heat of the pan, and the sight of those pastel speckles against the rich brown dough was nothing short of a visual celebration of the season.
What sets this version apart from the sea of “cake mix” hacks floating around the internet is the balance of texture and flavor that feels almost contrived—yet it’s completely achievable with three simple pantry staples. Most recipes get the crumb wrong, ending up either dry as a desert or soggy as a rain‑soaked sponge; this one hits the sweet spot, delivering a bar that’s both sturdy enough to hold its own on a plate and melt‑in‑your‑mouth soft when you bite into it. The secret? A tiny tweak that most home cooks overlook: the addition of a splash of oil that turns the batter into a glossy, pliable dough that spreads evenly, giving you those coveted caramelized edges.
And there’s a surprise ingredient that will make you question everything you thought you knew about cake mix desserts—an extra‑virgin vanilla extract that doesn’t just flavor but amplifies the chocolate and candy notes, turning a simple snack into a springtime indulgence. I’ll walk you through every single step — by the end, you’ll wonder how you ever made it any other way. Okay, ready for the game‑changer? Let’s dive in.
What Makes This Version Stand Out
- Texture: The bars boast a crunchy, caramelized perimeter that gives way to a chewy, almost cakey center, creating a mouthfeel that dances between cookie and brownie.
- Flavor Depth: The combination of yellow cake mix, vanilla, and semi‑sweet chocolate chips builds a layered sweetness that isn’t cloying, while the Easter M&Ms add bursts of fruity tang.
- Simplicity: You only need six ingredients—no measuring flour, no complicated creaming steps, just dump, mix, and bake.
- Visual Appeal: The pastel candy speckles make these bars a centerpiece for any spring gathering, turning a humble dessert into a festive masterpiece.
- Crowd Reaction: Guests often claim it’s the best version they’ve ever tasted, and the “I’ll be honest — I ate half the batch before anyone else got to try it” confession becomes a running joke.
- Ingredient Quality: Using a high‑quality yellow cake mix and real vanilla extract elevates the whole dish, proving that you don’t need gourmet ingredients to create gourmet results.
- Cooking Method: Baking in a single sheet pan ensures even heat distribution, guaranteeing consistent browning without the need for a fancy convection oven.
- Make‑Ahead Potential: These bars keep beautifully for days, making them perfect for prep‑ahead brunches or last‑minute potluck contributions.
Inside the Ingredient List
The Flavor Base
The star of the show is the yellow cake mix. It provides a light, buttery foundation that’s already balanced with sugar and leavening, meaning you skip the hassle of measuring flour, baking powder, and salt. If you skip this, you’ll end up with a dense, un‑risey bar that feels more like a brownie that never quite lifted. For the best flavor, choose a brand that uses real butter rather than oil, as it adds a richer mouthfeel. A quick tip: give the box a gentle shake before opening to redistribute any settled ingredients.
The Texture Crew
Next up, vegetable oil at ⅓ cup. This isn’t just a fat source; it lubricates the batter, ensuring those coveted caramelized edges and a glossy finish. If you replace it with melted butter, you’ll get a richer taste but lose some of that crispness. A solid alternative is coconut oil for a subtle tropical twist, though it will add a faint coconut aroma that may compete with the vanilla.
The Unexpected Star
The vanilla extract might seem modest, but its aromatic compounds amplify the chocolate and candy flavors, turning a simple sweet into something that feels handcrafted. If you’re feeling adventurous, a splash of almond extract can add a nuanced nuttiness, but be careful—almond is potent and can easily overpower the other flavors.
The Final Flourish
The duo of Easter M&M candies and semi‑sweet chocolate chips provides texture contrast and bursts of color. The M&Ms stay firm, adding a playful crunch, while the chocolate chips melt into a silky river that binds the bar together. If you’re allergic to peanuts, opt for plain M&Ms or even chopped dried apricots for a fruitier note. When selecting chocolate chips, choose a brand with at least 45% cocoa for a balanced sweetness that doesn’t overwhelm the candy.
Everything's prepped? Good. Let's get into the real action...
The Method — Step by Step
Preheat your oven to 350°F (175°C) and line a 9×13‑inch baking pan with parchment paper, letting the excess hang over the sides for easy lift‑out later. This step is crucial because a properly heated oven creates that golden crust that signals the bar is ready for the next level. When the oven door closes, you’ll hear a faint whoosh as the heat rushes in—listen for that, it’s the sound of success beginning.
In a large mixing bowl, combine the entire box of yellow cake mix with the two large eggs, ⅓ cup of vegetable oil, and the teaspoon of vanilla extract. Using a sturdy wooden spoon, fold everything together until the batter is smooth and glossy, but stop before it becomes overly stiff. The mixture should look thick yet spreadable, resembling a thick pancake batter.
Gently fold in the semi‑sweet chocolate chips, ensuring they’re evenly dispersed. You’ll notice the chips start to sink slightly, creating little chocolate islands that will later melt into a glossy river.
Now, the fun part: fold in the Easter M&M candies. These colorful gems should be scattered throughout the batter, and you’ll see a burst of color that makes the mixture look like a springtime confetti parade. Be careful not to over‑mix, or the M&Ms might start to melt.
Spread the batter evenly in the prepared pan, using a spatula to smooth the top. The surface should be level, with the edges slightly higher—this will promote the caramelized border we all love. If you want ultra‑even edges, use the back of a spoon to press the batter gently against the pan walls.
Slide the pan into the preheated oven and bake for 20‑25 minutes. Around the 15‑minute mark, peek through the oven window; the edges should begin to pull away from the pan and turn a deep golden brown. The center will still look slightly soft—that’s perfect because it will continue cooking as it rests.
When the timer dings, perform the “toothpick test”: insert a toothpick into the center; it should come out with a few moist crumbs but no wet batter. The aroma at this point is intoxicating—a buttery, chocolatey perfume that makes the whole kitchen feel like a bakery on a sunny morning.
Allow the bars to cool in the pan for 10 minutes, then use the parchment overhang to lift the whole slab onto a cooling rack. This step prevents the bars from becoming soggy on the bottom. As they cool, the edges will firm up, creating that satisfying snap when you break them apart.
That's it — you did it. But hold on, I've got a few more tricks that'll take this to another level...
Insider Tricks for Flawless Results
The Temperature Rule Nobody Follows
Most home bakers set the oven to a static 350°F, but the secret to those caramelized edges is a brief blast of higher heat. After the first 15 minutes, crank the temperature up to 375°F for the final 5 minutes. This surge creates a Maillard reaction that deepens the flavor without burning the interior. I once tried skipping this step, and the bars turned out pale and flat—lesson learned.
Why Your Nose Knows Best
Never rely solely on a timer; your nose is the ultimate indicator. When the edges start to emit a nutty, toasted scent, that’s the signal they’re ready for the next stage. Trusting your olfactory senses prevents over‑baking, which can turn the chewy center into a dry crumb. I’ve watched friends pull out bars too early, only to watch them collapse—don’t be that person.
The 5‑Minute Rest That Changes Everything
Once out of the oven, let the bars rest for exactly five minutes before cutting. This brief pause allows the structure to set, preventing the bars from crumbling or sliding apart. It also lets the chocolate and candy settle into the crumb, giving each bite a cohesive flavor burst. Skipping this rest is a common mistake that leads to messy plates and disappointed guests.
Mix‑It‑Yourself vs. Store‑Bought Mix
If you’re a purist, you can recreate the cake mix by whisking together flour, sugar, baking powder, and a pinch of salt. However, the store‑bought mix contains emulsifiers that help the batter hold together, especially when you add oil and eggs. I tried a DIY version once, and the bars turned out crumbly—so unless you’re a lab‑coat, stick with the box.
Cool‑Down Trick for Perfect Slices
After the bars have cooled on a rack, chill them in the refrigerator for 15 minutes before slicing. The chilled dough cuts cleaner, giving you sharp edges rather than ragged crumbs. This is the same reason bakers chill cookie dough before baking; the fats solidify, resulting in a cleaner break.
Creative Twists and Variations
This recipe is a playground. Here are some of my favorite ways to switch things up:
Nutty Delight
Swap half of the M&M candies for chopped toasted almonds or pecans. The nuts add a buttery crunch that pairs beautifully with the chocolate, and the earthy flavor balances the sweetness. Perfect for guests who love a bit of texture.
White Chocolate Raspberry
Replace the semi‑sweet chocolate chips with white chocolate chips and add a handful of freeze‑dried raspberry pieces. The tartness of the raspberries cuts through the sweetness, creating a sophisticated flavor profile that feels upscale.
Caramel Swirl
Drizzle a generous spoonful of caramel sauce over the batter before baking, then use a knife to swirl it in. The caramel pockets melt into gooey centers, making each bite a surprise of sticky sweetness.
Holiday Blend
For a non‑Easter version, use red and green M&Ms for a Christmas twist, or orange and black for Halloween. The same base works year‑round; just change the candy colors to match the occasion.
Protein Power
Add a scoop of vanilla whey protein powder to the batter and replace half the oil with Greek yogurt. This boosts the protein content without sacrificing texture, making the bars a post‑workout treat.
Gluten‑Free Adaptation
Use a gluten‑free yellow cake mix and ensure your chocolate chips are certified gluten‑free. The result is just as tender, proving that dietary restrictions don’t have to limit indulgence.
Storing and Bringing It Back to Life
Fridge Storage
Place the cooled bars in an airtight container and store them in the refrigerator for up to five days. The chilled environment keeps the chocolate from blooming and preserves the chewy interior. If you notice the bars drying out, cover them with a damp paper towel before sealing the container.
Freezer Friendly
These bars freeze like a dream. Wrap each bar individually in plastic wrap, then place them in a zip‑top freezer bag. They’ll stay fresh for up to three months. When you’re ready to enjoy, let them thaw at room temperature for 20 minutes, then give them a quick warm‑up in a 300°F oven for five minutes to revive the crisp edges.
Best Reheating Method
To bring the bars back to life, preheat your oven to 300°F, place the bars on a parchment‑lined sheet, and bake for three to five minutes. Add a tiny splash of water (about a teaspoon) to the pan before reheating; the steam helps the interior regain its softness while the exterior re‑crispes. The result is a bar that tastes just as fresh as the day it was baked.