I still remember the Great Hot Honey Chicken Catastrophe of last winter. There I was, standing in my tiny kitchen, oil splattering everywhere like some sort of poultry-themed Jackson Pollock painting, my smoke detector serenading me with its shrill anthem of failure. The chicken pieces I'd lovingly marinated for hours were more soggy than crispy, the honey glaze had turned into a burnt sugar nightmare cemented to my favorite pan, and my dinner guests were due to arrive in twenty minutes. In that moment of culinary despair, clutching my fire extinguisher like a safety blanket, I made a vow: I would crack the code for perfectly crispy, sticky-sweet, spicy-hot honey chicken that didn't require a PhD in deep-fryer management or a kitchen fire extinguisher on standby.
Fast forward through seventeen recipe tests, three emergency grocery runs, and one very patient roommate who became my official taste tester (willingly or not), and here we are. This baked version delivers everything you crave about the fried original—the shatteringly crisp coating that crackles like autumn leaves under your teeth, the sticky-sweet heat that clings to every crevice, the juicy chicken that stays impossibly moist—without turning your kitchen into a disaster zone. The secret lies in a triple-threat coating technique that creates nooks and crannies for maximum crunch, combined with a hot honey glaze that seeps into every bite without making everything soggy.
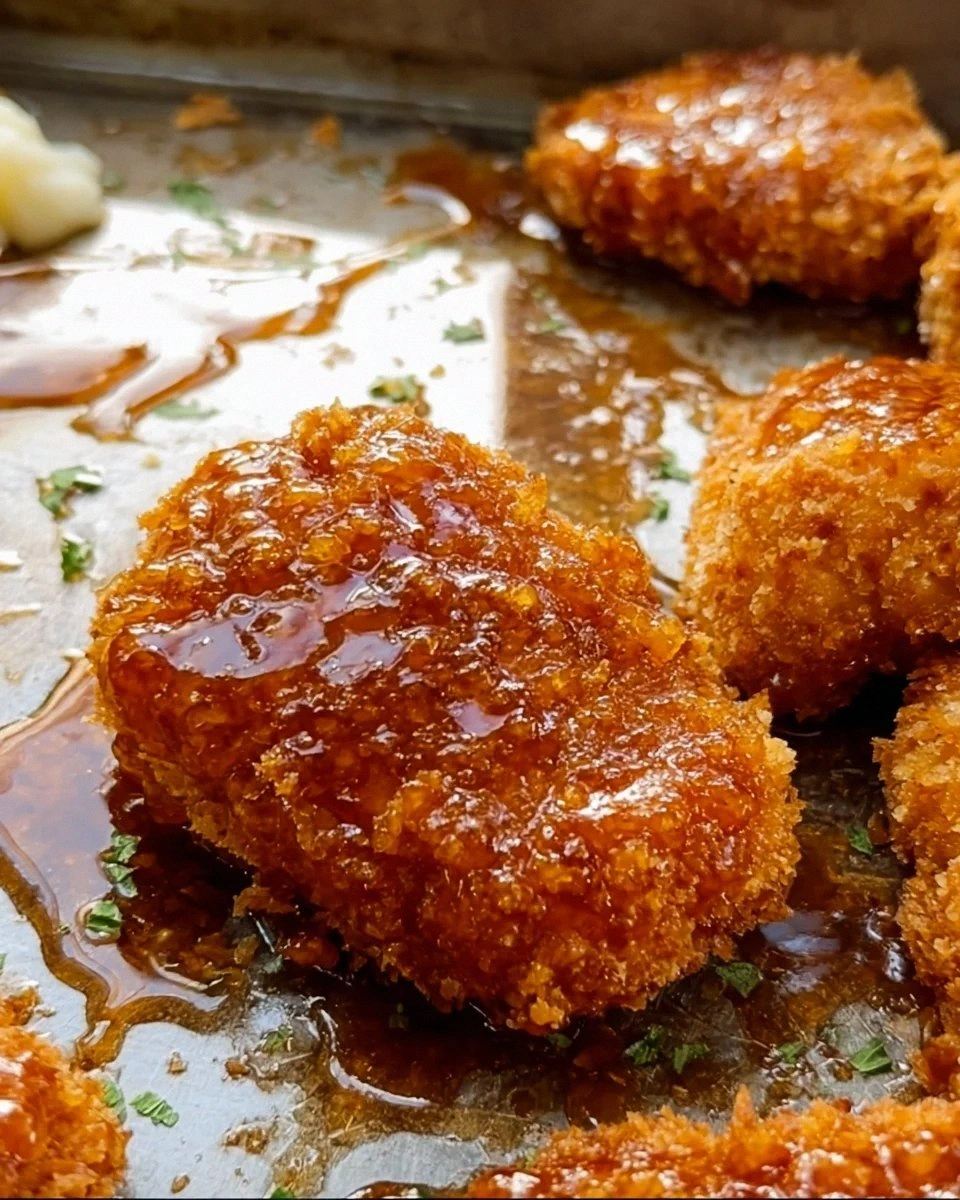
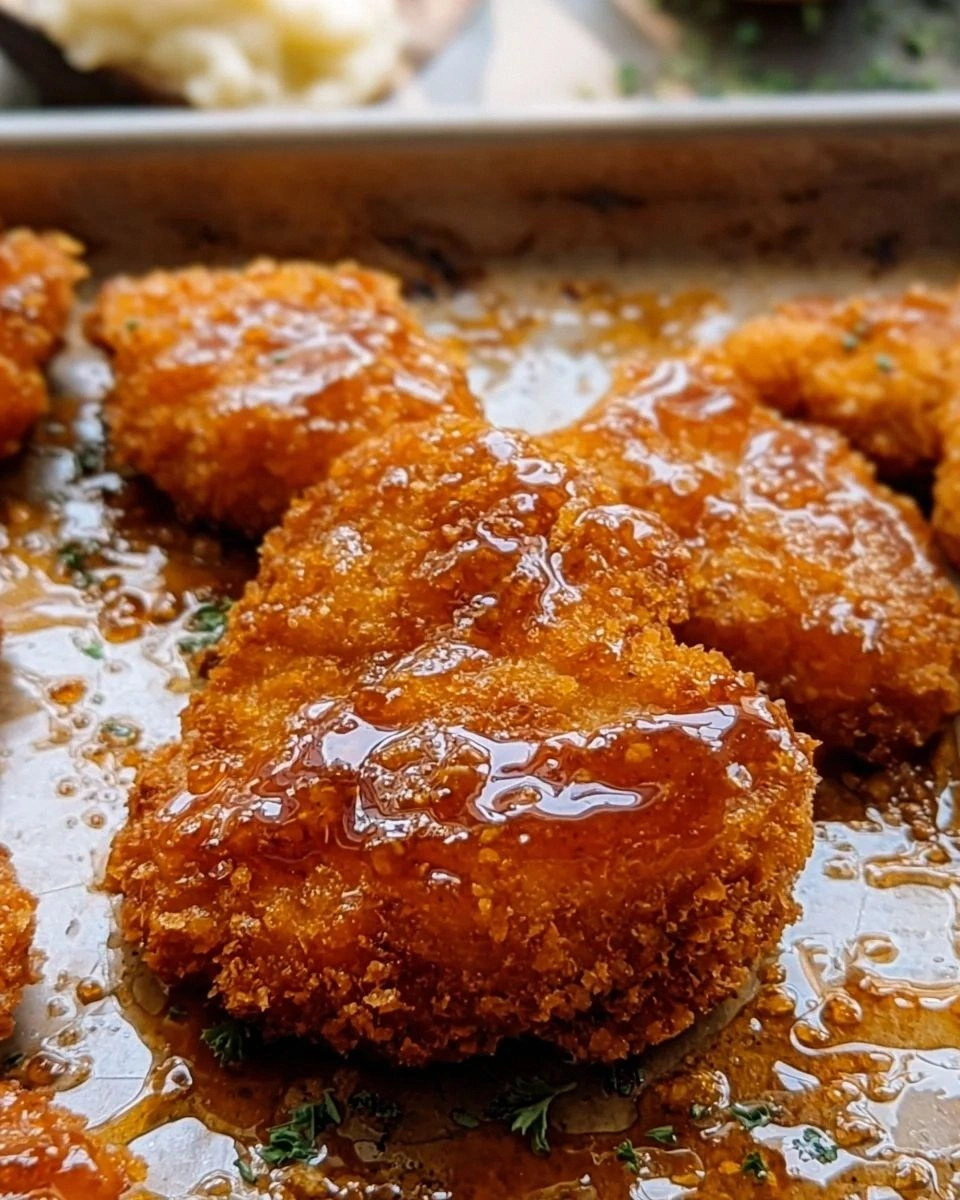
Picture this: you pull a sheet pan from the oven, the kitchen filling with the intoxicating aroma of caramelized honey and warm spices. The chicken pieces glisten like edible rubies, the coating bubbled and blistered into the most gorgeous texture you've ever seen. You break one open—yes, immediately, because who has willpower at a time like this?—and the crust shatters into a thousand crispy pieces while the meat inside stays so juicy it practically drips down your chin. That first bite hits you with layers of flavor: sweet, spicy, tangy, with a whisper of smoke that lingers just long enough to make you reach for another piece before you've even finished chewing the first.
What makes this recipe absolutely foolproof is that it works with whatever you've got—chicken thighs, breasts, tenders, even wings if you're feeling fancy. The coating stays crispy for hours (though good luck having leftovers), the glaze can be dialed up or down depending on your heat tolerance, and the whole thing comes together in under an hour without any special equipment beyond a sheet pan and some parchment paper. Let me walk you through every single step—by the end, you'll wonder how you ever made it any other way.
What Makes This Version Stand Out
Crunch Factor: Most baked chicken recipes deliver sad, soggy coating that tastes like disappointment and wet cardboard. This one uses a revolutionary cornflake-panko hybrid that creates jagged, crispy edges so dramatic they could star in their own action movie. The coating stays shatter-crisp even after the honey glaze goes on, giving you that perfect textural contrast in every bite.
Heat That Builds: Instead of one-note spice that hits you like a freight train and then disappears, this hot honey creates a gentle warmth that blooms across your palate. It starts sweet, builds to a pleasant tingle, and finishes with just enough kick to make you reach for your drink—not because you need relief, but because it feels good.
Hands-Off Cooking: No babysitting a pot of splattering oil, no turning pieces every thirty seconds, no oil burns on your forearms that make you look like you lost a fight with a deep fryer. Pop everything on a sheet pan, slide it into the oven, and let the heat do all the work while you mix up the glaze.
Make-Ahead Magic: The coating mixture keeps for weeks in an airtight container, meaning you can whip up a batch of this chicken on a Tuesday night without any prep work. I've made triple batches and stored them in mason jars like some sort of crispy chicken fairy godmother, ready to transform plain chicken into something extraordinary at a moment's notice.
Crowd-Pleasing Flexibility: Kids love it because it's basically fancy chicken nuggets. Adults love it because the flavor complexity keeps them coming back for more. Serve it at a dinner party and watch people hover around the platter like vultures, or pack it in lunchboxes for the most enviable meal in the office.
Pantry-Friendly Ingredients: Everything lives in your kitchen already—no hunting for obscure spices or specialty items that cost more than your monthly grocery budget. Even the hot honey is just regular honey with a few pantry staples stirred in.
Leftovers That Actually Improve: Unlike most crispy chicken that turns into soggy sadness overnight, these pieces stay crunchy and actually develop deeper flavor as the honey glaze continues to work its magic. Cold from the fridge at midnight? Absolutely life-changing.
Alright, let's break down exactly what goes into this masterpiece...
Inside the Ingredient List
The Flavor Foundation
Chicken thighs are the unsung hero of this recipe, delivering juicier, more flavorful meat that stays tender even if you accidentally overcook it slightly. Unlike chicken breasts that dry out faster than my skin in winter, thighs forgive your attention lapses and reward you with succulent bites every time. The fat content in thighs also means they self-baste as they cook, keeping everything moist while the exterior gets crispy. If you're a die-hard breast person (no judgment), go ahead and use them, but cut the pieces smaller and reduce cooking time by about five minutes.
Buttermilk might seem like an optional luxury, but it's actually doing serious heavy lifting here. The lactic acid gently tenderizes the chicken while the proteins create a sticky surface that helps the coating adhere like Velcro. No buttermilk? No problem—regular milk with a tablespoon of lemon juice or vinegar works in a pinch, though the flavor won't be quite as complex. Let your chicken lounge in this tangy bath for at least thirty minutes, but overnight is where the real magic happens.
The Texture Crew
Cornflakes are about to become your new best friend in the kitchen. These humble breakfast flakes transform into the most incredible crispy coating when crushed and mixed with a few choice seasonings. The irregular edges create nooks and crannies that catch and hold the honey glaze, while the toasty corn flavor adds depth you can't get from plain breadcrumbs. Generic brands work perfectly here—save the fancy organic ones for your breakfast bowl.
Panko breadcrumbs bring the light, airy crunch that makes Japanese fried chicken so addictive. Combined with the cornflakes, they create a coating that's both delicate and substantial, with pockets of air that stay crispy even under the honey glaze. Don't substitute regular breadcrumbs—they're too dense and will give you a heavy, greasy coating that sits in your stomach like a brick.
The Unexpected Star
Smoked paprika is the secret weapon that elevates this from good chicken to transcendent chicken. Just a teaspoon adds layers of complexity—sweet, smoky, with a hint of bitter that balances the honey perfectly. Regular paprika works if that's all you've got, but you'll miss that campfire whisper that makes people ask "what's in this?" after their first bite.
Cornstarch might seem out of place here, but it's the key to bakery-level crunch. Mixed into the coating, it creates a barrier that prevents the chicken's moisture from turning everything soggy. It also helps the coating brown more evenly, giving you those gorgeous golden pieces that look like they came from a professional kitchen.
The Final Flourish
Hot honey is having a moment right now, and for good reason. The combination of sweet honey and spicy peppers creates an addiction that's harder to kick than your morning coffee habit. Store-bought versions work fine, but making your own means you control the heat level and add personal touches like garlic or herbs. The honey needs to be warm when you drizzle it over the chicken—cold honey will seize up and create a sticky mess that's impossible to distribute evenly.
Apple cider vinegar in the honey glaze adds brightness that cuts through the richness and prevents the sweetness from becoming cloying. Just a splash wakes up all the other flavors and gives the glaze a complexity that keeps you coming back for bite after bite. White wine vinegar works too, but avoid balsamic—it'll muddy the flavors and turn everything an unappetizing brown color.
Everything's prepped? Good. Let's get into the real action...
The Method — Step by Step
- Start by cutting your chicken into manageable pieces—about two-bite size works perfectly. You want them small enough to cook through quickly but large enough to stay juicy. Think chicken tender size, or cut breasts into thirds. Place everything in a bowl and season generously with salt and pepper. Don't be shy here—under-seasoned chicken is a culinary tragedy that no amount of glaze can fix. Let it sit while you mix up the buttermilk bath, giving the salt time to work its way into the meat.
- Pour buttermilk over the chicken until it's just covered, then add a splash of hot sauce if you're feeling adventurous. This isn't about making it spicy yet—that comes later with the glaze. The hot sauce adds another layer of flavor that makes people wonder why your chicken tastes better than everyone else's. Cover the bowl with plastic wrap and let it hang out in the fridge for at least thirty minutes, but honestly, overnight is where the real flavor development happens. I've left it for two days before (life got busy) and it was absolutely incredible.
- While the chicken marinates, make your coating mixture. In a large bowl, combine crushed cornflakes, panko, smoked paprika, garlic powder, onion powder, salt, pepper, and cornstarch. Use your hands to really mix everything together—you want the spices evenly distributed so every bite tastes the same. The mixture should look like fancy seasoned breadcrumbs with personality. Taste a pinch (yes, raw coating mixture) to check the seasoning—it should be bold and flavorful on its own.
- Set up your breading station like a professional: marinated chicken on one side, flour in a shallow dish, beaten eggs in another, and your coating mixture in a wide bowl. This is where the magic happens, so don't rush it. Let excess buttermilk drip off each piece before flouring—too much liquid and the coating won't stick properly. Press the flour into every nook and cranny, creating a dry surface for the egg to grab onto.
- Dip the floured chicken in egg, let excess drip off, then roll it in the coating mixture. Really press the coating on—this isn't a gentle pat situation. You want maximum coverage for maximum crunch. Place each piece on a wire rack set over a baking sheet as you go. The wire rack is crucial—it lets hot air circulate around the chicken, crisping up the bottom instead of letting it steam in its own juices.
- Preheat your oven to 425°F (220°C) and position a rack in the middle. While it heats, let your breaded chicken rest on the counter. This brief rest helps the coating adhere better and prevents it from sliding off in sheets when you bite into it. The coating should look dry and set, not gummy or wet.
- Bake the chicken for 15 minutes, then flip each piece and bake another 10-15 minutes until golden brown and crispy. The coating should be deeply colored and bubbled, with some darker spots that add caramelized flavor. If your pieces are different sizes, check the smaller ones first—they'll cook faster and nobody likes dry chicken.
- While the chicken bakes, make your hot honey glaze. Warm honey in a small saucepan over low heat—just enough to make it runny, not boiling. Stir in your choice of hot sauce, apple cider vinegar, and a pinch of salt. Start conservative with the hot sauce—you can always add more, but you can't take it out. Taste as you go, remembering that the heat will mellow slightly as it cools.
- Pull the chicken from the oven and let it rest for exactly five minutes. This brief pause lets the juices redistribute and prevents them from running out when you cut into the meat. Brush or drizzle the warm hot honey over the chicken while it's still hot—the glaze will seep into all those crispy nooks and create a glossy finish that makes everyone reach for their phones to Instagram dinner before they even taste it.
That's it—you did it. But hold on, I've got a few more tricks that'll take this to another level...
Insider Tricks for Flawless Results
The Temperature Rule Nobody Follows
Here's the thing about oven temperature: most recipes lie to you. They say 375°F because they're afraid you'll burn things at 425°F, but higher heat is exactly what you need for crispy coating without drying out the meat. The intense heat sets the coating quickly, creating a moisture-proof barrier before the chicken can dry out. Just make sure your oven is fully preheated—rushing this step is like trying to start a race before the gun goes off. If your oven runs hot (and many do), drop the temperature to 400°F and add a few extra minutes to the cooking time.
Why Your Nose Knows Best
Forget timers—your nose is the most reliable doneness indicator you own. When the chicken is perfectly cooked, your kitchen will fill with the most incredible aroma of toasted corn and caramelized honey. If you start smelling something that reminds you of burnt popcorn, get that chicken out immediately. The visual cues matter too: the coating should be deep golden with some darker spots, and the edges should look crispy and bubbled. Undercooked coating looks pale and sad, like it needs a beach vacation.
The 5-Minute Rest That Changes Everything
I know you're hungry. I know the chicken looks incredible. But walk away for exactly five minutes after it comes out of the oven. This isn't optional—it's the difference between chicken that stays crispy and chicken that turns into a soggy mess when the glaze hits it. The rest allows the coating to set and the juices to redistribute, meaning when you bite in, you get crispy coating and juicy meat instead of coating that slides off like a bad toupee.
The Glaze Consistency Secret
Your hot honey glaze should coat the back of a spoon but still be pourable. Too thick and it sits on top like a sticky helmet; too thin and it runs off, taking all your crispy coating with it. If it gets too thick while you're working, just warm it slightly with a splash of water. The glaze should be warm when it hits the chicken—cold honey seizes up and creates an uneven coating that looks like your chicken has a skin condition.
Storage That Actually Works
Here's a confession: I deliberately make extra because this chicken is arguably better the next day. Store pieces in a single layer on a paper towel-lined plate, covered loosely with foil. The paper towel absorbs excess moisture while the foil prevents the coating from getting soggy. When you're ready to reheat, skip the microwave (it'll turn everything rubbery) and use a 350°F oven for 8-10 minutes. Add a fresh drizzle of hot honey and it'll taste like you just made it.
Creative Twists and Variations
This recipe is a playground. Here are some of my favorite ways to switch things up:
Buffalo Hot Honey Explosion
Replace the hot sauce in your glaze with Frank's RedHot and add a tablespoon of butter for that classic buffalo flavor. The result tastes like someone took your favorite sports bar wings and turned them into something you can serve at a dinner party without shame. Serve with celery sticks and a side of blue cheese dressing for dipping, and watch grown adults fight over the last piece like it's the final slice of pizza at 2 AM.
Korean-Inspired Gochu Honey
Swap the hot sauce for gochujang (Korean chili paste) and add a teaspoon of sesame oil to the glaze. The fermented chili paste brings incredible depth and umami that makes regular hot sauce taste one-dimensional. Top with toasted sesame seeds and scallions, and suddenly you've got fusion chicken that tastes like it came from the coolest Korean restaurant in town. Your dinner guests will think you're way more sophisticated than you actually are.
Maple Chipotle Dream
Use maple syrup instead of honey and add a minced chipotle pepper in adobo sauce. The smoky chipotle pairs beautifully with the sweet maple, creating a glaze that's like liquid autumn. This version is particularly good with turkey if you want to use it for a non-traditional Thanksgiving appetizer. The maple makes it feel fancy enough for holidays while the chipotle keeps it interesting enough that people won't just eat it because it's polite.
Lemon Pepper Crunch
Add two tablespoons of lemon zest and a teaspoon of black pepper to your coating mixture, then finish with a glaze made from honey, lemon juice, and a touch of cayenne. It's bright, zesty, and addictive in a completely different way than the original. This version is perfect for summer when you want something crispy but not heavy. The lemon adds a freshness that makes it taste almost healthy (it's not, but let's pretend).
Everything Bagel Chicken
Mix everything bagel seasoning into your coating and finish with a honey glaze that includes a touch of Dijon mustard. It's breakfast meets dinner in the best possible way, like someone took your favorite bagel and turned it into something you can eat with your hands while watching football. The sesame and poppy seeds in the seasoning get extra toasty and add incredible flavor.
Garlic Parmesan Heaven
Add garlic powder and grated Parmesan to your coating mixture, then finish with a glaze that's half honey, half garlic butter. It's like someone took garlic bread and chicken and made them have a beautiful baby. Warning: this version is so good you might find yourself eating it cold from the fridge at midnight, standing in front of the open door like some sort of garlic vampire.
Storing and Bringing It Back to Life
Fridge Storage
Store your cooled chicken in an airtight container with paper towels between layers to absorb excess moisture. It'll keep for up to four days, though good luck having it last that long. Don't crowd the container—overcrowding creates steam that turns everything soggy. If you made a huge batch (smart move), consider storing the pieces in a single layer on a baking sheet, covered with plastic wrap, then transferring to a container once cold.
Freezer Friendly
This chicken freezes beautifully for up to three months. Cool completely, then arrange in a single layer on a baking sheet and freeze until solid. Transfer to freezer bags with parchment paper between layers. When you're ready to eat, you can reheat directly from frozen at 400°F for 15-20 minutes. The coating won't be quite as crispy as fresh, but it's still miles better than any frozen chicken you'd buy at the store.
Best Reheating Method
The oven is your friend here—microwaves are the enemy of crispy coating. Reheat at 350°F for 8-10 minutes, adding a fresh drizzle of hot honey halfway through. The key is getting it hot enough to re-crisp without drying out the meat. If it seems like it's drying out, tent loosely with foil for the last few minutes. Add a tiny splash of water before reheating—it steams back to perfection, keeping the meat juicy while the coating stays crisp.